CDS 2026 Application Form can be submitted till 11th June 2026 for session 2. Aspiring candidates looking to join the defence forces can complete the application on the online UPSC website. The CDS 2 2026 exam is scheduled to take place offline on 13th September 2026.
Do you dream of serving the nation? Then CDS 2026 exam is for you. Check Steps to Register >>
UPSC CDS 2026 Notifications – Application till 11th June
![]() CDS 2 2026 Registration can be done till 11th June 2026. Check here for application form details.
CDS 2 2026 Registration can be done till 11th June 2026. Check here for application form details.
The Union Public Service Commission (UPSC) administers the CDS exam to recruit young professionals into the military services, including the Indian Army, Air Force, and Navy. This exam is held twice annually, with sessions in April and October.
All the candidates who qualify for the CDS exam, then appear for the SSB in different cities across the country. After the release of the final merit list, selected candidates will join their preferred academies, such as the Indian Military Academy (IMA), Officers Training Academy (OTA), Indian Air Force Academy (AFA), and Indian Naval Academy (INA).
Still Confused? Comment Your Query Here.
This article provides comprehensive details on the application process for CDS 2026. Candidates can refer to the information below for a full step by step CDS 2026 form filling procedure.
How to Fill CDS 2026 Application Form
The Complete CDS Registration 2026 is divided into four parts – Create Account & Login, Universal Registration, CAF & Apply for Exam. Valid/ Active Email id and mobile number should be provided in the registration form to further communicate at various stages of examination process.
Candidates can follow the below-mentioned steps to apply for CDS I/II 2026:

Step- 1: Create Account & Login
- Visit the UPSC official website (link is given above).
- A new page will be opened on the screen.
- On the right-hand side of the web page, click on the “Creat Account” button.
- Read the instructions carefully and tick the declaration.
- Now click on the “Proceed for Account Creation” option.

- Now, Enter your Email ID & Captha and click on “Get OTP” button.
- Once again verify your details carefully and click on “I Agree” button.
- Now, verify the OTP details.
- Enter your received Email OTP and click on “Verify OTP” button.
- Now, enter your mobile number and verify it using an received OTP.

- Now create a strong password by following the password policy.
- The instructions to create password is given in top of the page.
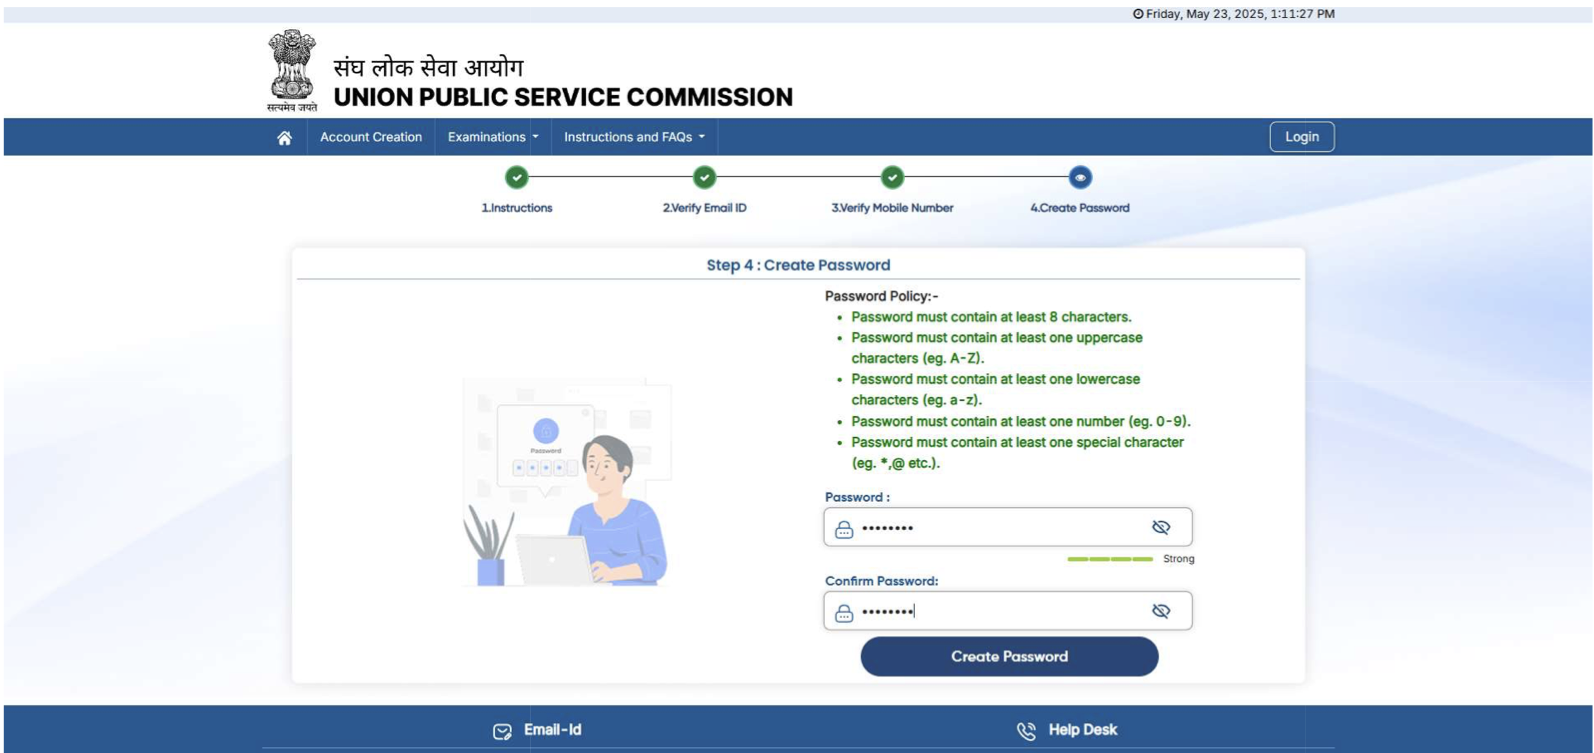
- After the successfull account creation, you will receive an sms and Email on the same registered mobile number and Email ID.
- Now, login again by entering the registered Email ID and password and proceed for next step.
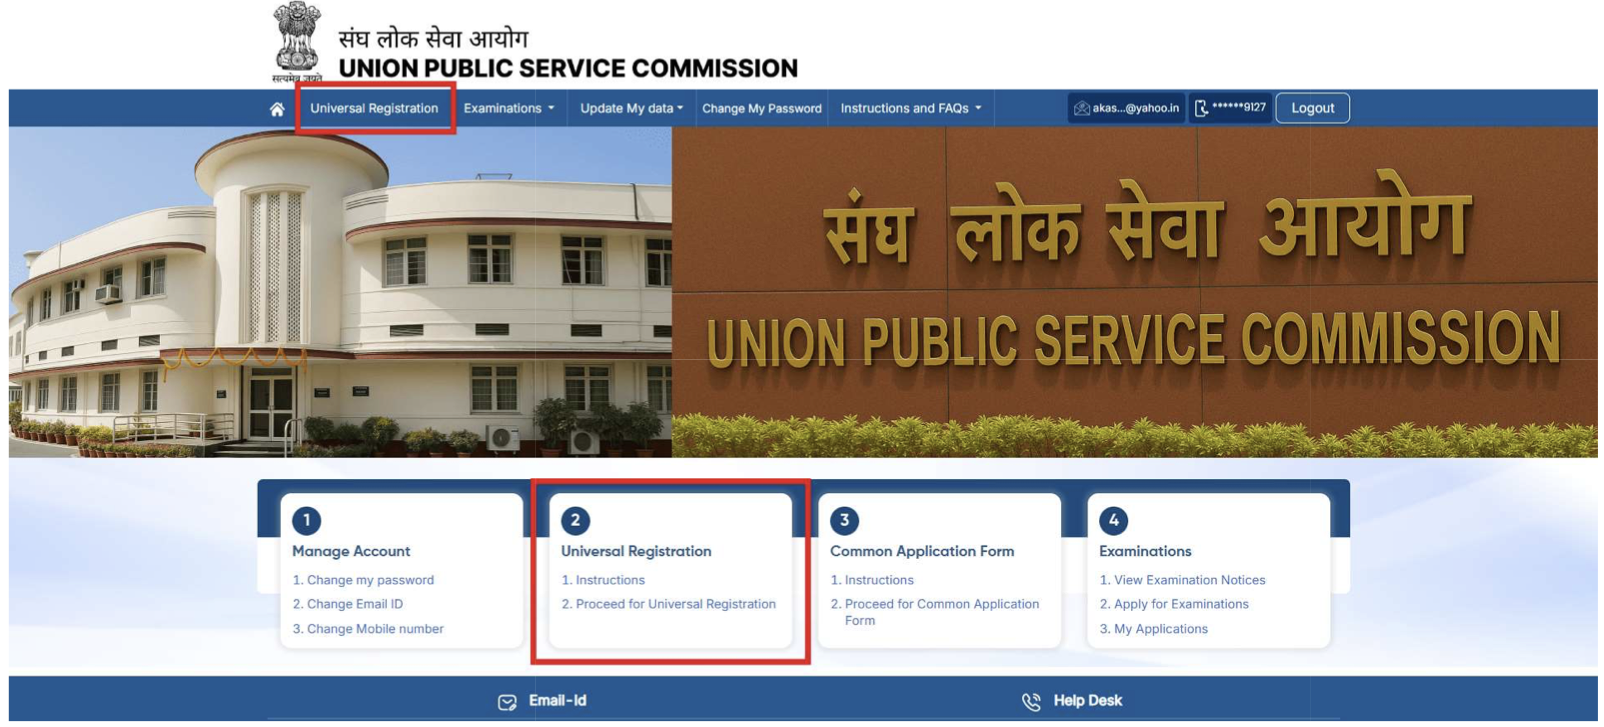
Step- 2: Universal Registration
- On the home page, go through the “Universal Registration” section.
- Now, read the instructions carefully and click on the “Proceed for Universal Registration” option.
Fill Details:
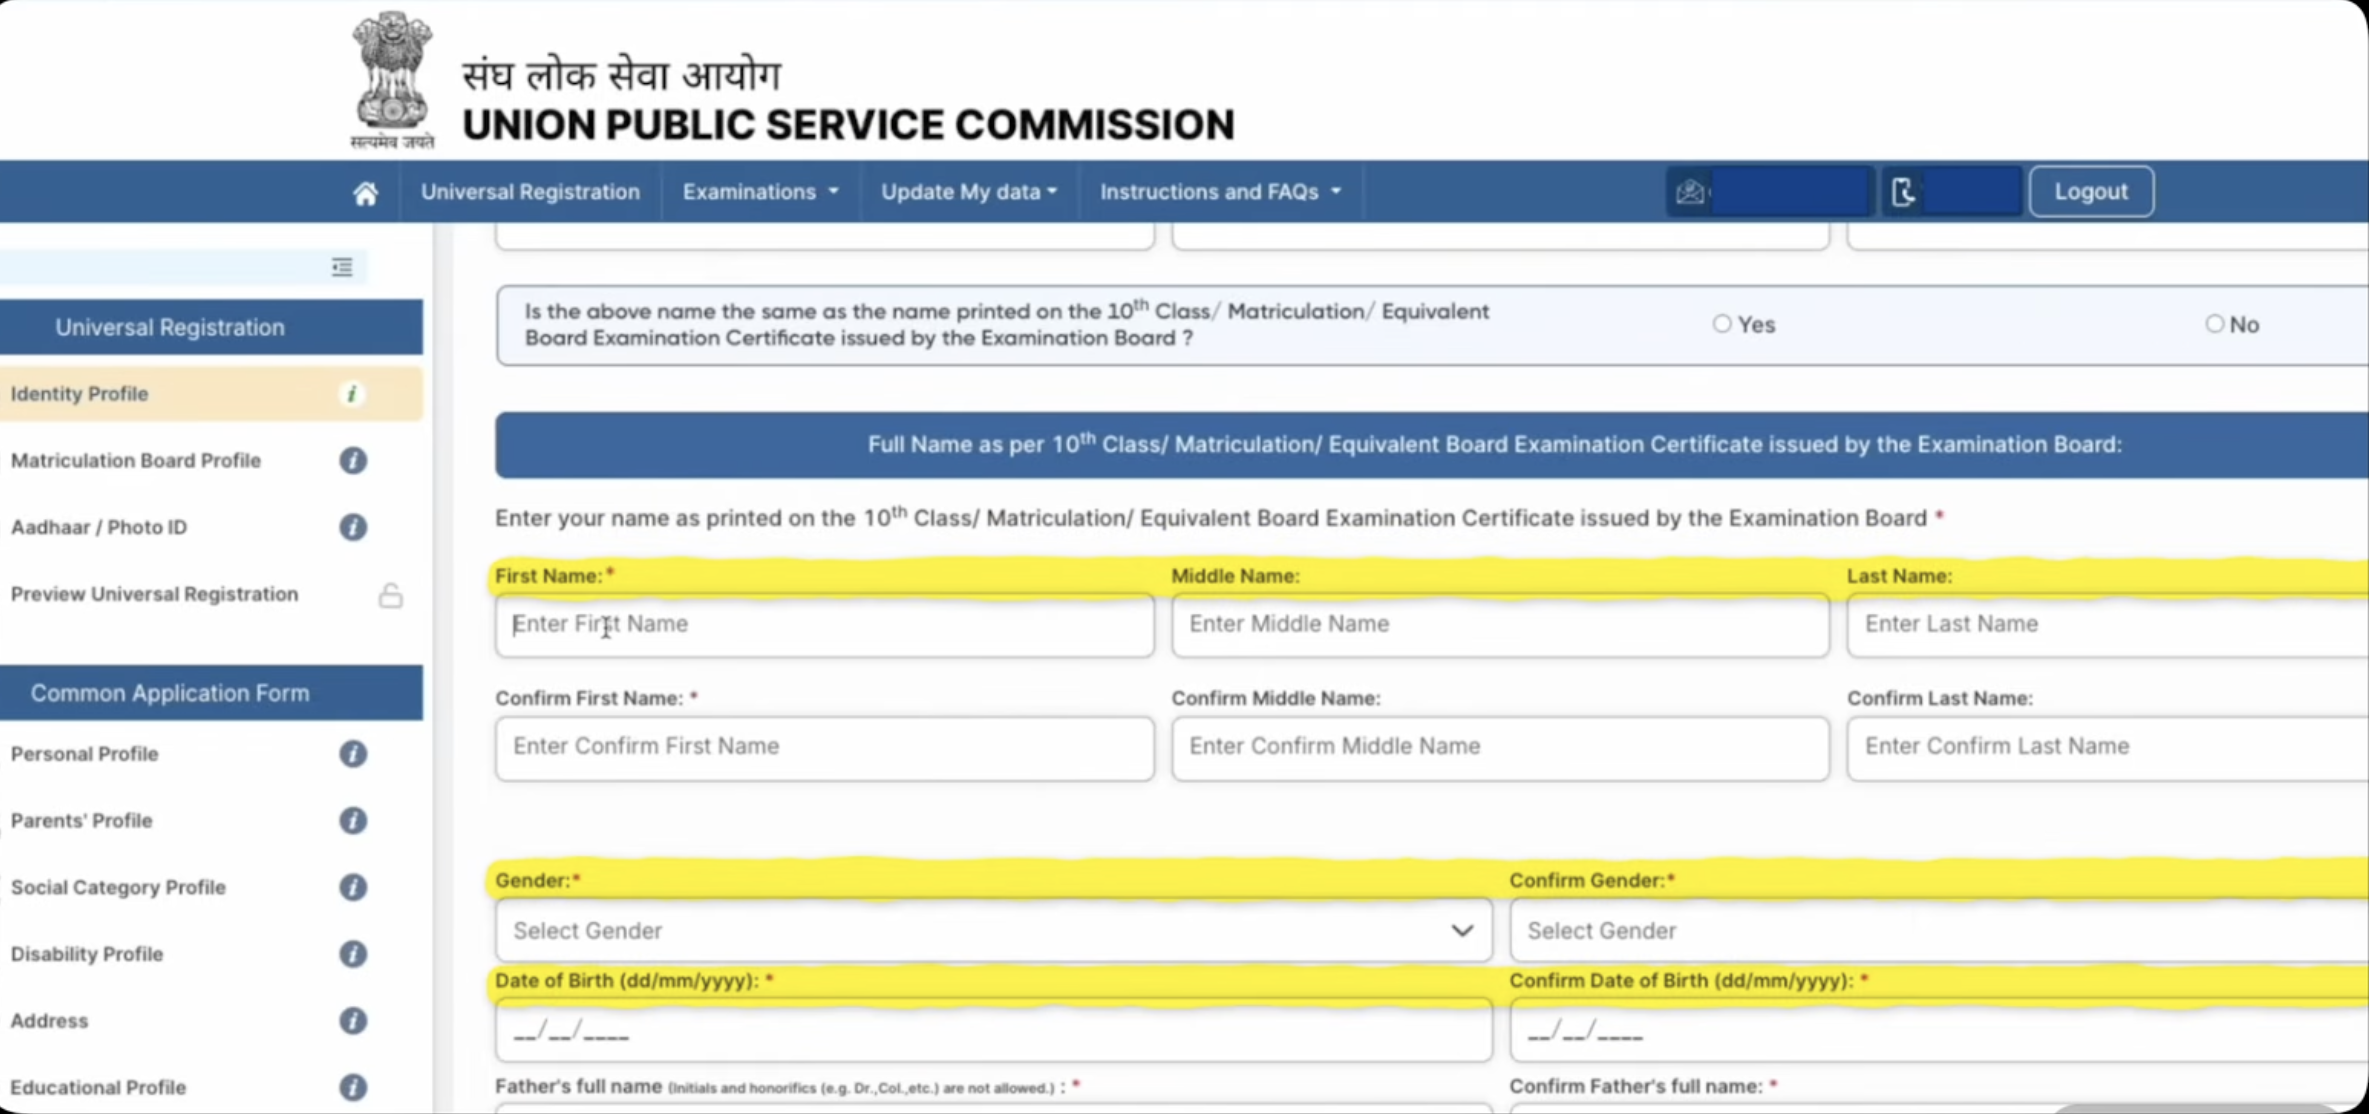
- Now go through the “Identity Profile” section.
- Enter your Name, DOB, Gender, Father’s Name, Mother’s Name, Guardian Name.
- Now click on “Next & Review”.
- Check the filled details carefully and click on the “Submit” button.
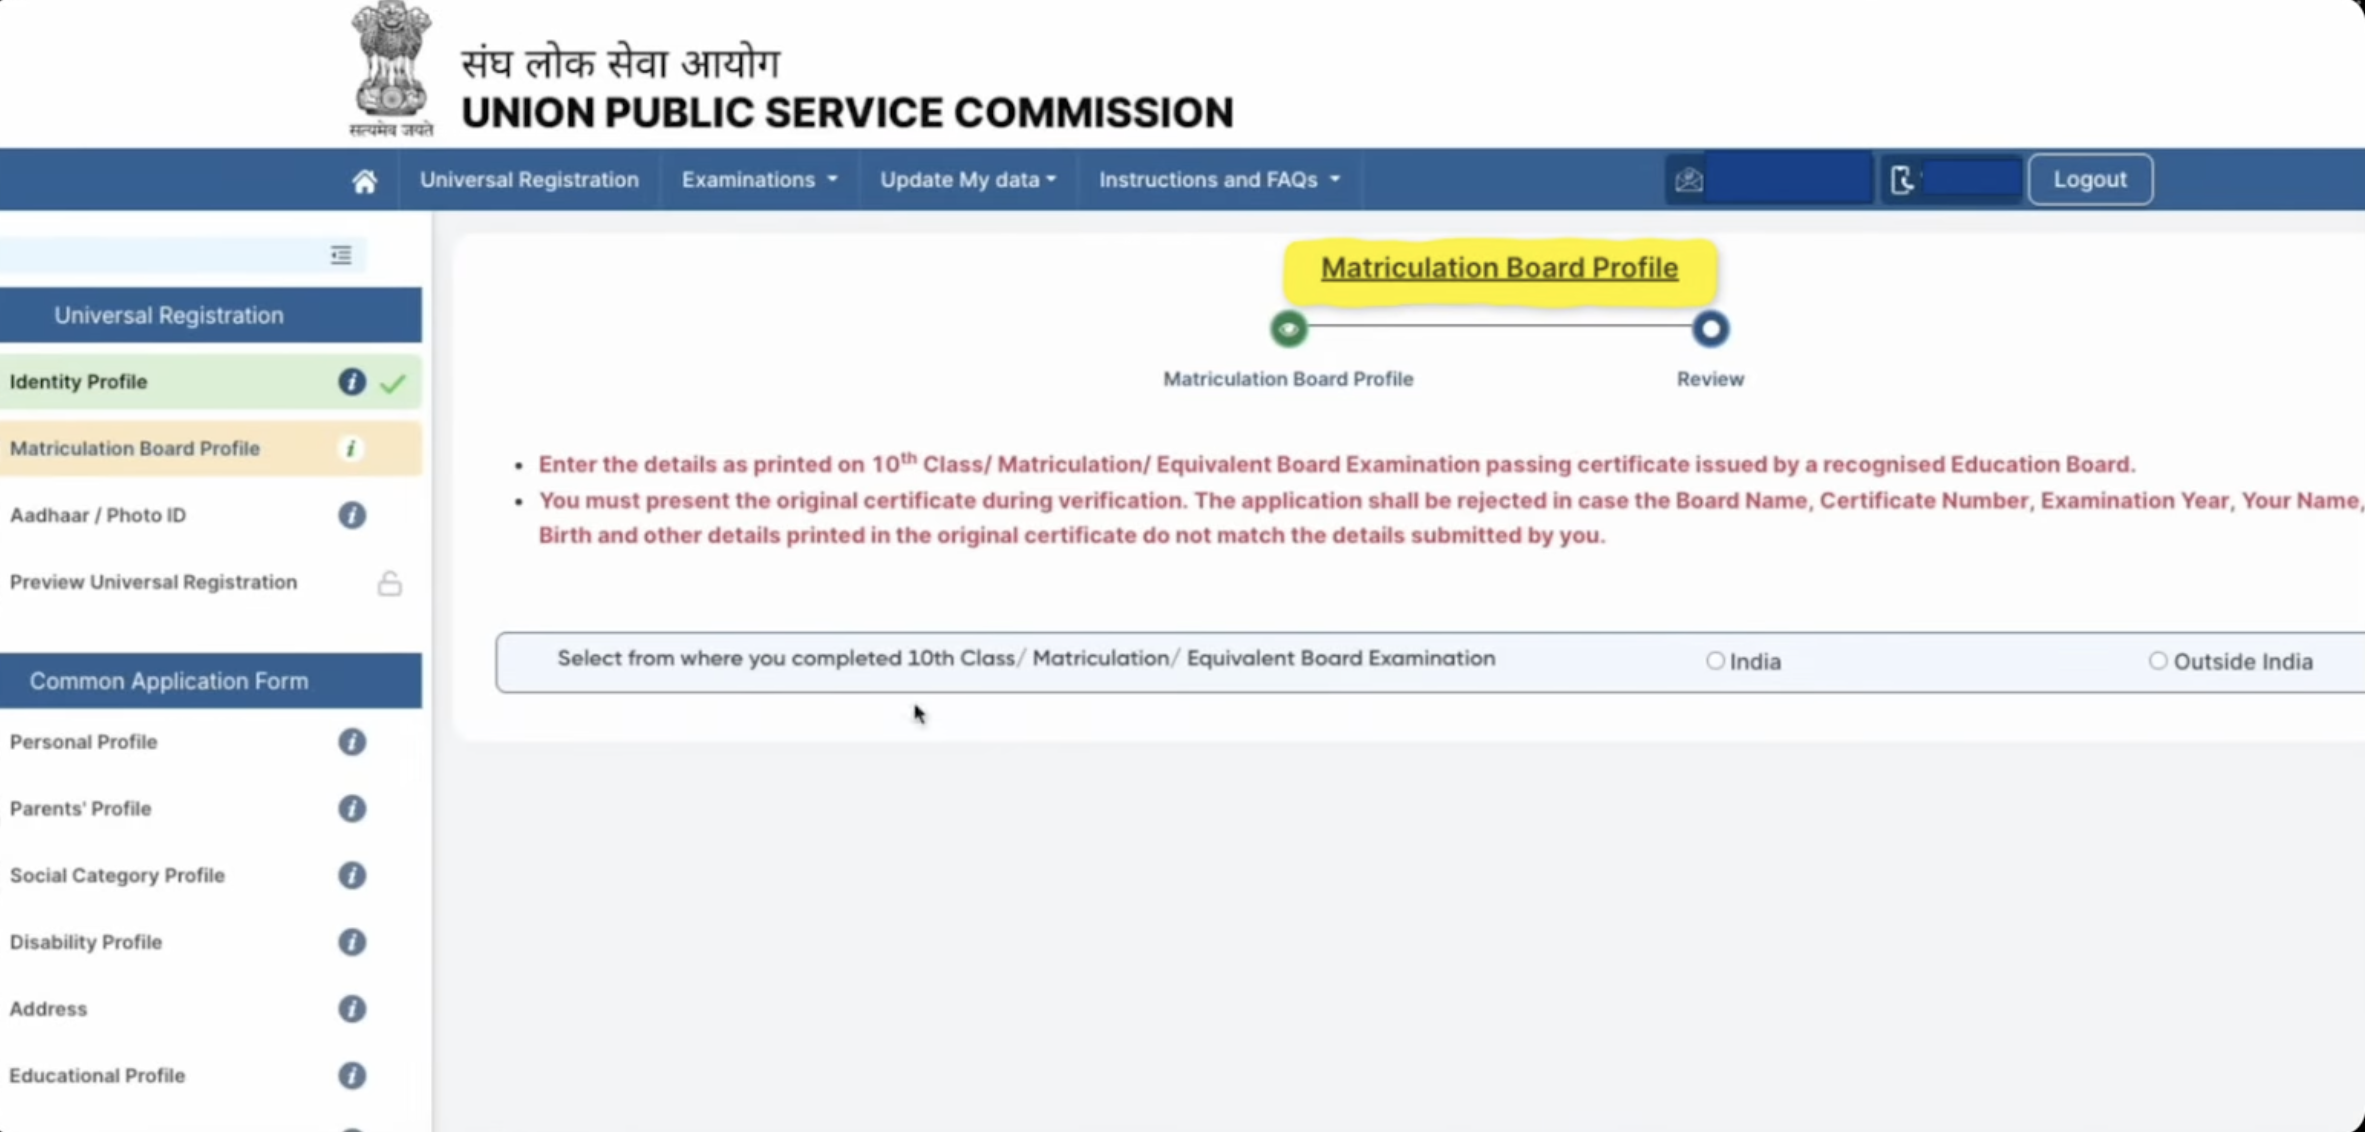
- Click on the “Matriculation Board Profile” option.
- Now fill the details like Board passing starte, Board Name, Year, Certificate Number, Roll Number, Issue Date and Percentage.
- After filling the details upload the 10th class certificate and click on “Submit” button.
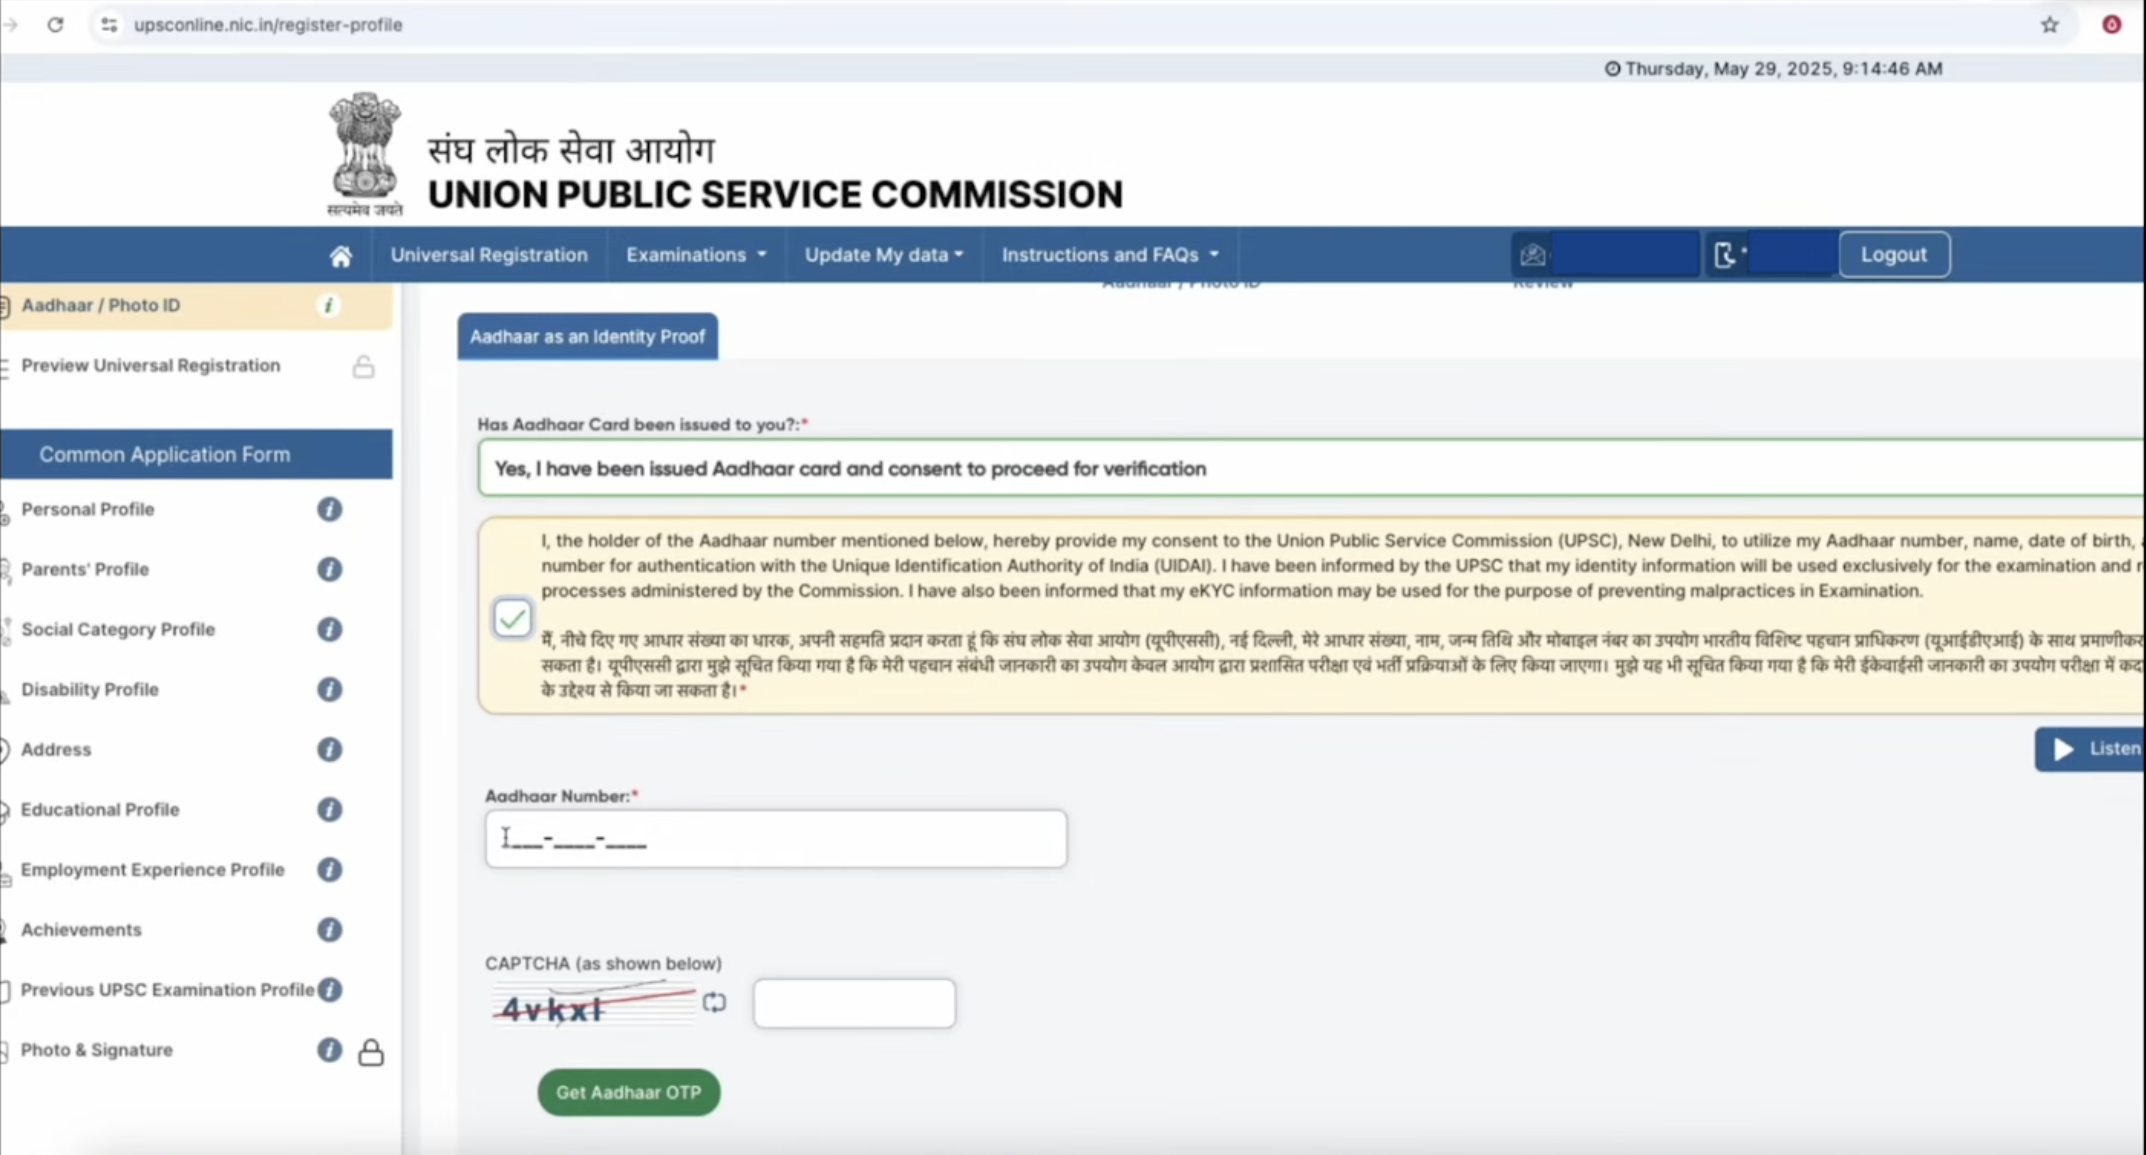
- For next step, click on the “Aadhaar & Photo ID” option.
- Accept the declaration, Enter your Aadhaar Number, Captcha & click on “Get Aadhaar OTP” option.
- You may also apply through other IDs like DL, PAN card, passport, Voter ID card etc.
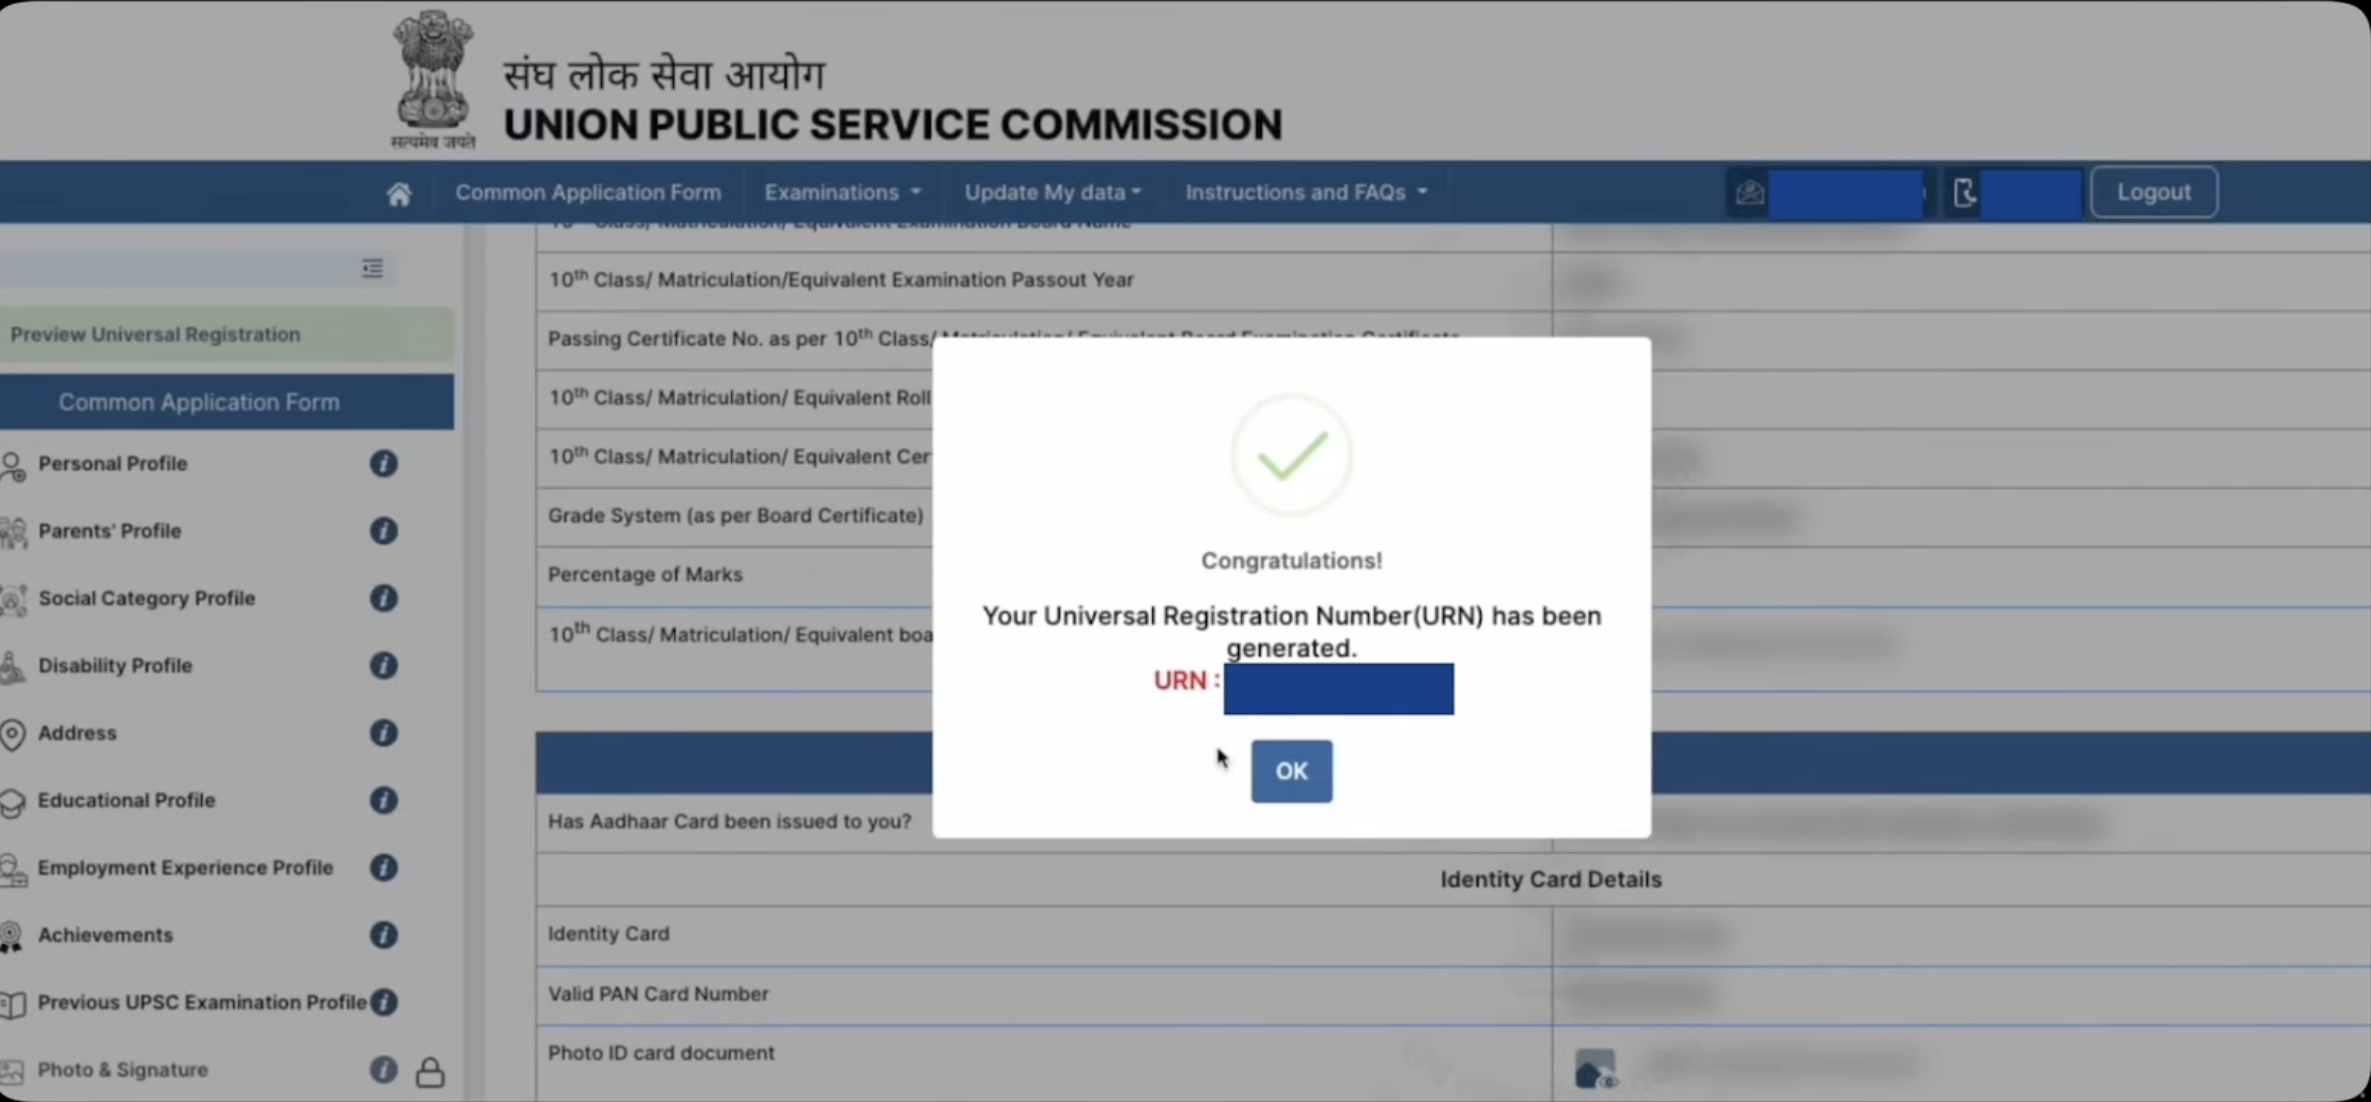
- After verifying the photo ID, review all the filled details and complete the universal registration.
- After final submission of the details, Universal Registration Number (URN) will be genrated.
- Make sure to keep it save for further use.
Step- 3: Common Application Form (CAF)
- Click on the “Proceed to fill common application form” button.
- Now fill your personal profile details like Nationality, State Domicile, Mother Tounge, Maritial Status, Place of Bith & Alternate contact information.
- Fill parents details such as Father’s Name, Mother’s Name, Status, Occupation and Nationality.
- After that Enter Social Category details. If you belong to any category than fill its required details. Also you have to upload your category certificate in this stage.
- Fill your Disability profile details.
- Next enter your correspondence address and current address details like state, district, city, post office and pincode.
- Submit your educational profile details like qualification level, status, passing year, board name, school name, subjects, roll number and medium.
- Fill your employment experience and achievements details (if any).
- Now fill previous UPSC exam details (If you have appeared previously).
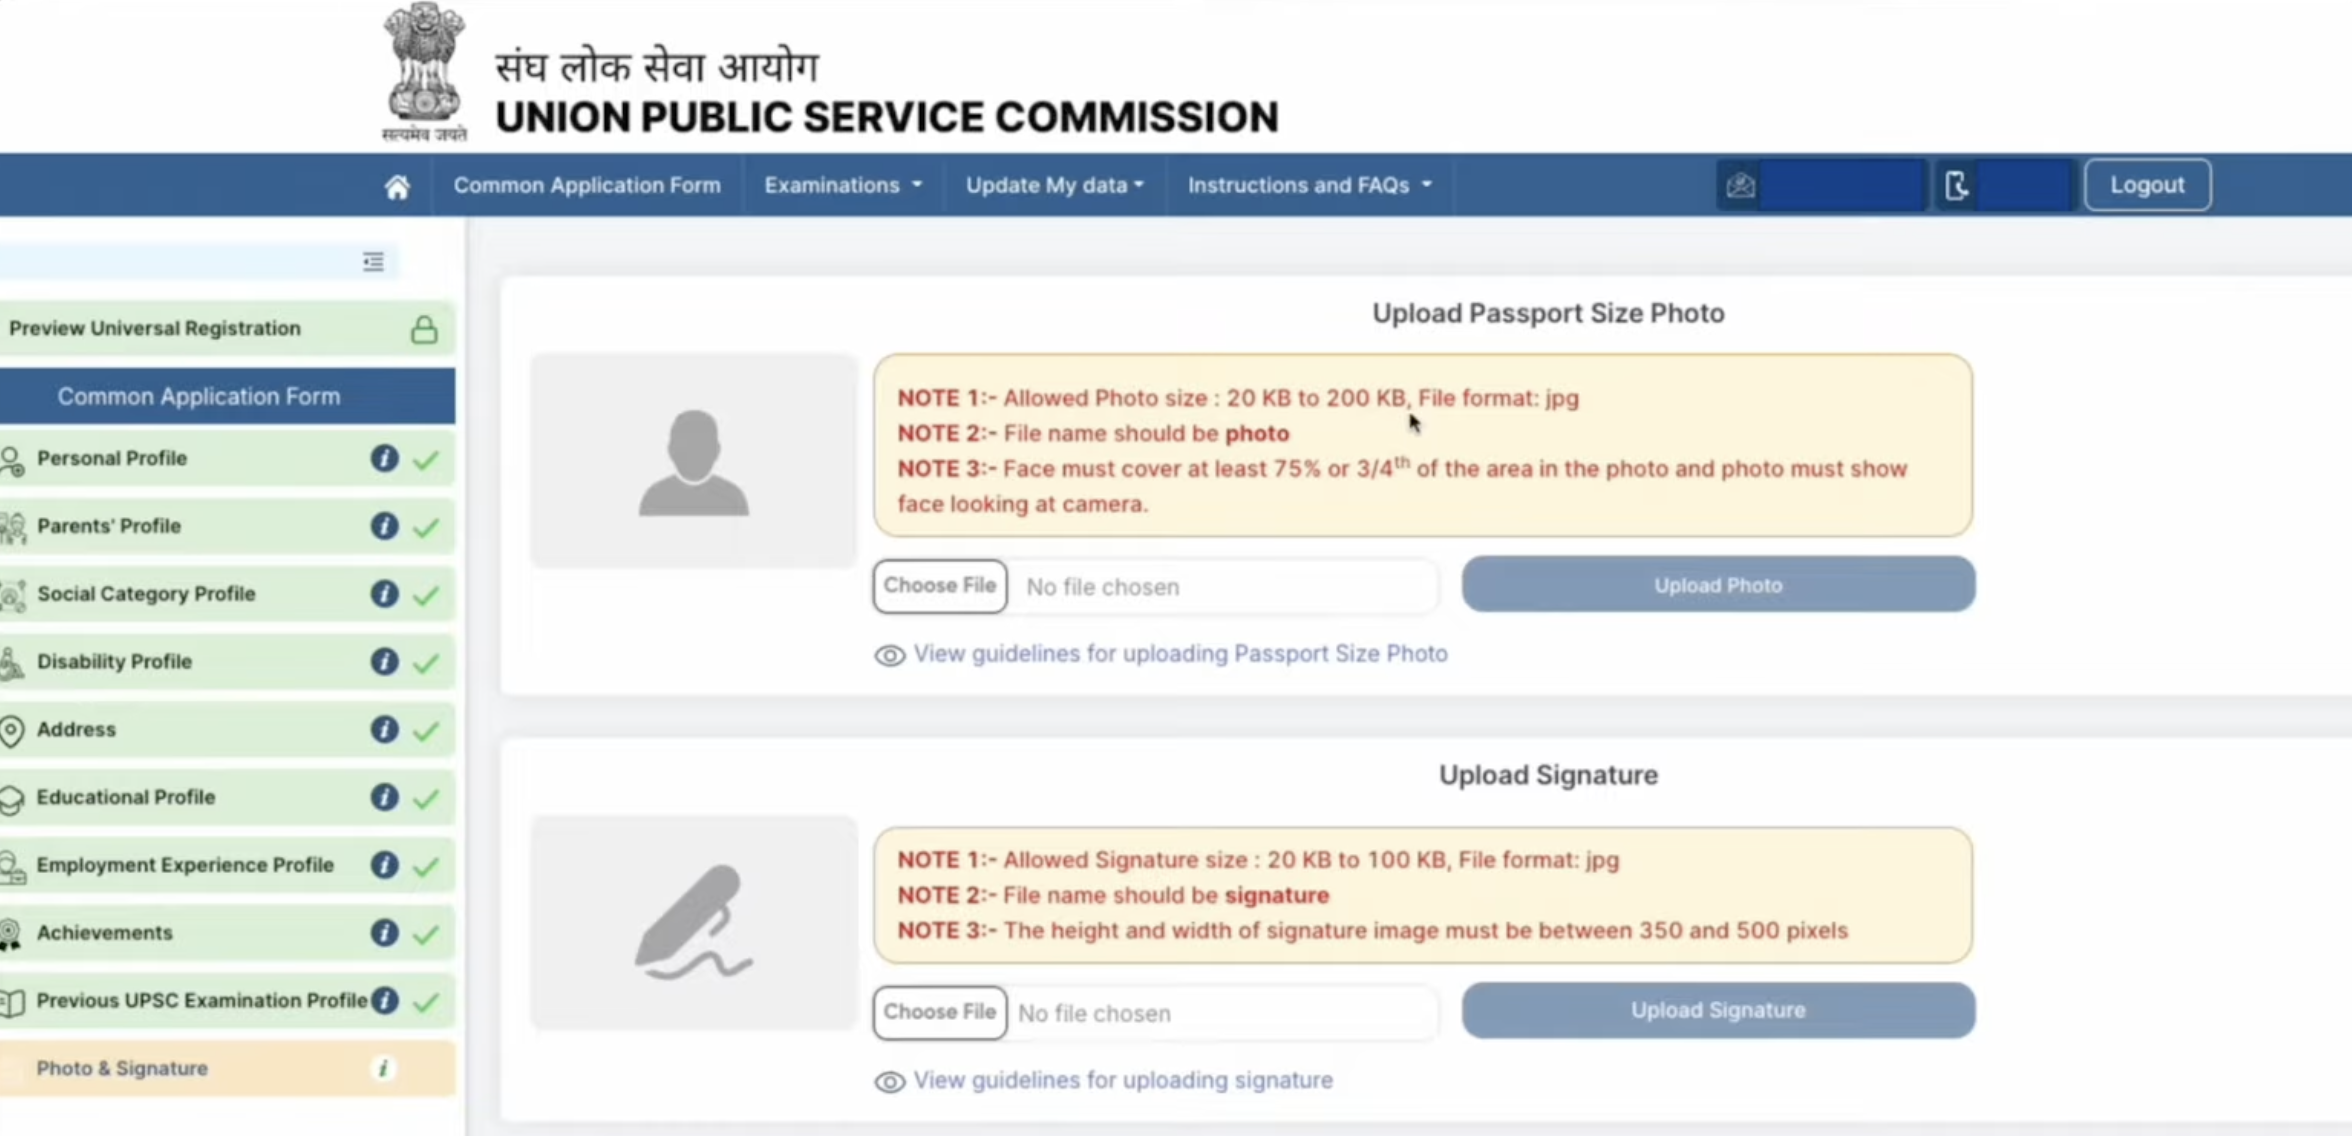
- Go through the photo & signature upload section.
- Upload the passport size photograph and signature as per the specification.
- Also candidates have to click on the “Capture from mobile” option.
- A QR code will appear on the screen, Now scan it and open link and upload your live photograph.
- After uploading the image, proceed for the next step.
Step- 4: Apply for Exam
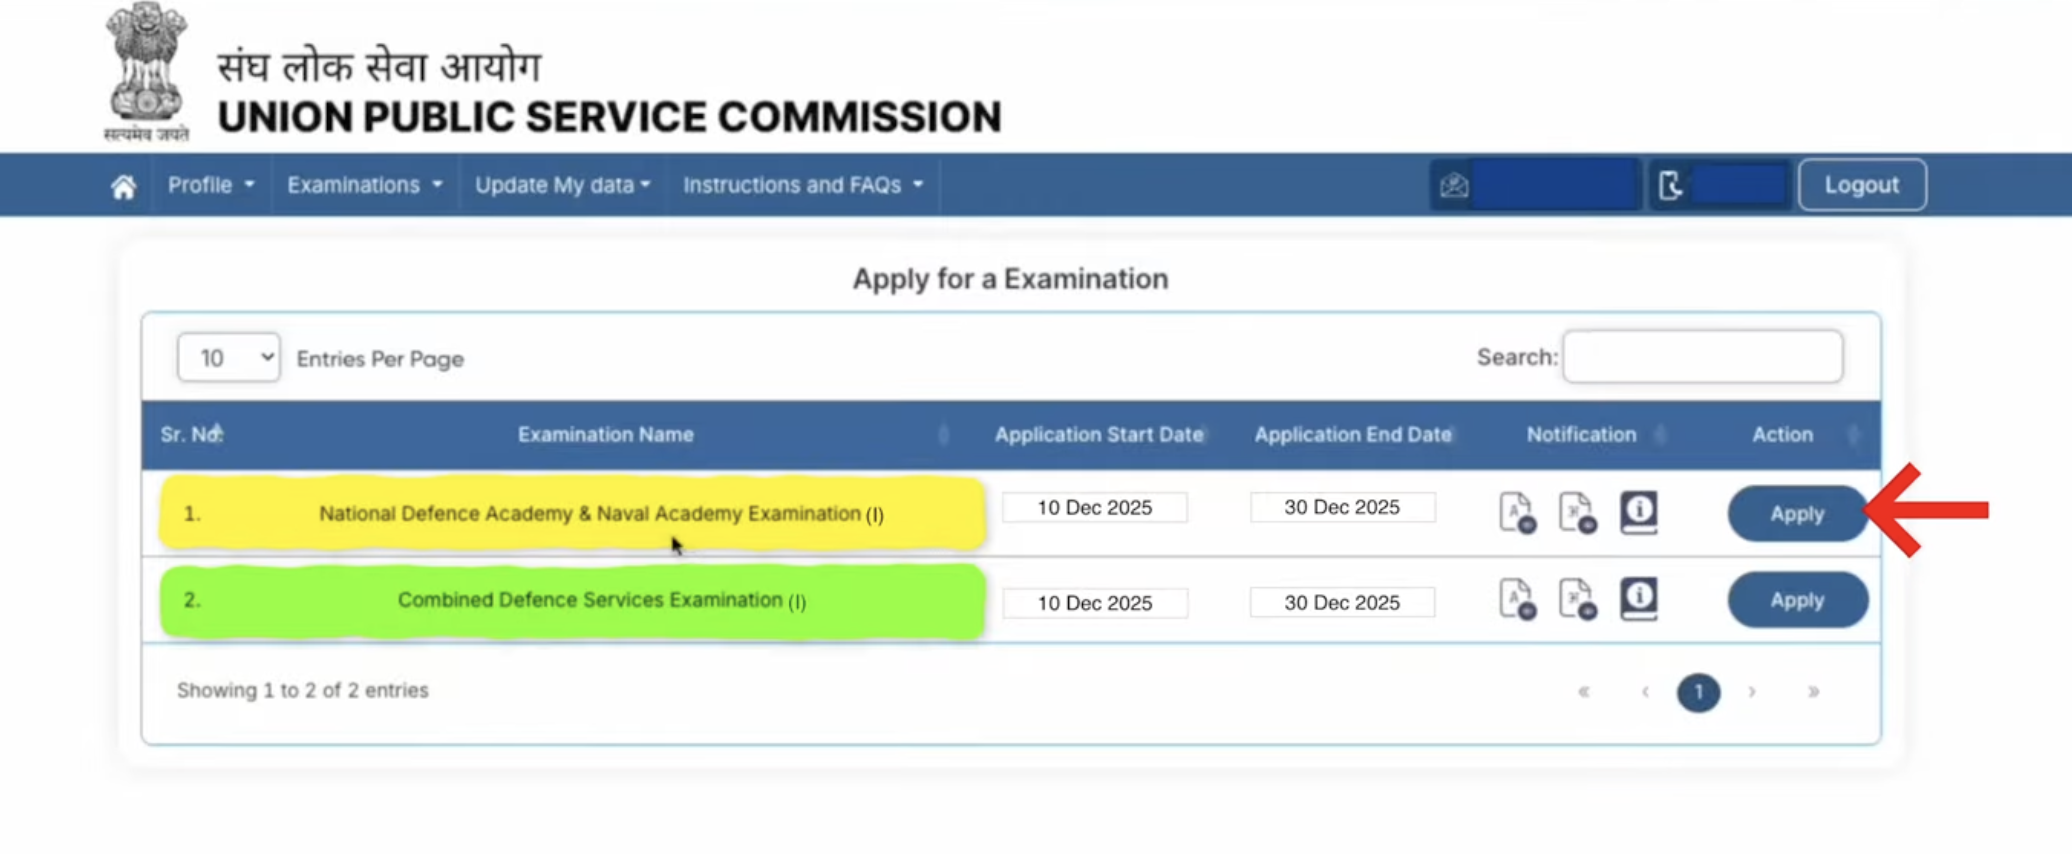
- Now go through the examination section and click on “Apply for Examination” option.
- In front of Combined Defence Services Examination, click on the “Apply” button.
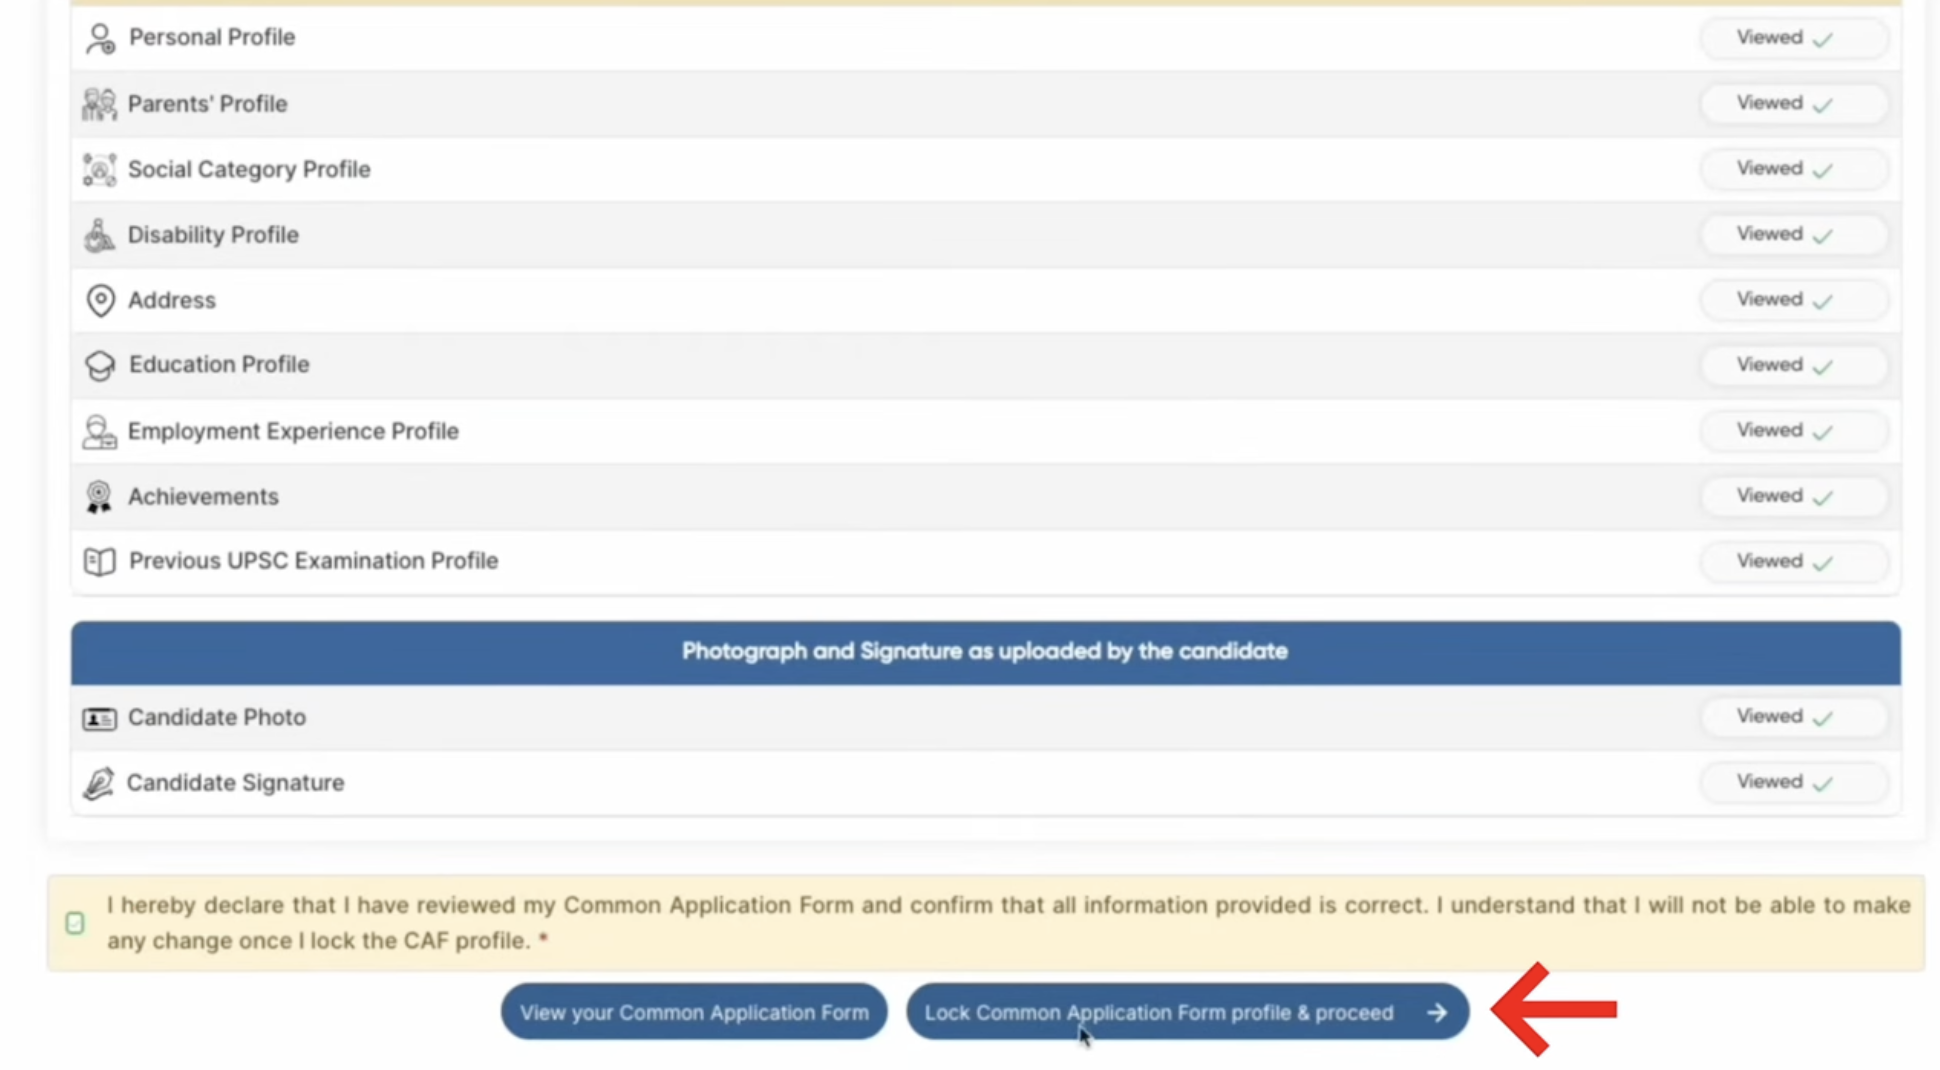
- Now your previously filled details will appear on the screen.
- review your filled details and click on the declaration.
- Click on the “Lock Common Application Form Profile & Proceed”.
- Now, select your educational qualification level.
- Enter your 12th roll number, certificate issue date & authority, full address of board.
- After filling the details, upload the 12th class certificate.
- Also provide Sainik/Military School status & other details.
- Now, select your preference of service like Army, Navy, Airforce, Naval Academy etc.
- Review all the filled details and click on “Next & Submit” button.
- Next select your exam centers choices as per your convience.
- Now tick the “I have read the declaration & Agree (Final Submit) option.
- If you belong to general category than you have to pay the application fee.
CDS 2026 Application Form
The application form for CDS 2026 is releasing twice a year. CDS 2026 registration form is available on the UPSC website from December 10, 2025. Candidates who want to appear for CDS I 2026 can fill out this form once it is released.
Candidates who think they are not well prepared for CDS I 2026 can consider appearing for CDS II 2026. The application form for CDS II 2026 is available on the website from May 20, 2026.
Application Fee:
- CDS 2026 Application fee can be submitted through online mode.
- Candidates can use their credit card/ debit card/ net banking, and other payment gateways to pay the CDS application fee.
- Candidates need to know that the CDS 2026 application fee is non-refundable and will not be given back at any cost.
| Category | Application Fee (INR) |
| General/ OBC Male Candidates | Rs. 200/- |
| Female/ SC/ ST Candidates | nil |
Documents Required for CDS 2026 Registration
Here’s the list of documents required to fill the Combined Defence Service 2026 application form:
- Class 10 Mark Sheet and passing certificate
- Class 12 Mark Sheet and passing certificate
- Graduation certificate
- Post Graduation certificate (If available)
- Domicile
- Category certificate (If applicable)
- NCC (National Cadet Corps) certificate
- Photo ID card
- Passport-sized photograph
- Scanned signature, etc.
In this article, we provide comprehensive details about the CDS 2026 exam and the application process. Candidates can find instructions for completing the application form, information about application fees, and other essential details.
If you have any queries about How to apply for CDS Exam 2026, ask in the comments section.