NEET 2026 Application Last Date has been extended till 11th March 2026. National Eligibility cum Entrance Test (NEET) is a national level entrance test managed by the National Testing Agency. NEET is organized for those candidates seeking admission into medical & dental courses.
Want a guide to apply step by step for NEET 2026? Just Scroll below
NEET 2026 Notifications – Application Extended
![]() NEET 2026 Registration last date has been extended till 11th March 2026. Check here for application form details.
NEET 2026 Registration last date has been extended till 11th March 2026. Check here for application form details.
These courses are offered by various medical institutions in the country. The NEET 2026 examination will be held on 3rd May 2026.

Have Queries? Ask us Here
Here, candidates can check step to step procedure for How to fill NEET 2026 Application Form.
NEET Application Form 2026
Candidates can fill out the application form from the website through online mode. NEET 2026 Application Form has been released on 8th February 2026. The last date to submit the application form is 11th March 2026.
The application form is not provided through any other mode except online. NTA has also provided the NEET 2026 correction facility in the application form through online mode. This is a one-time opportunity to correct the application. Correction facility has been commenced from 12th to 14th March 2026.
Also Check:
NEET 2026 Eligibility Criteria
NEET 2026 Application Correction
Steps to Fill Application Form
Candidates have to follow the given five steps to fill out the application form.
Step 1: Fill Registration Form and Note Down the Registration Number.
Step 2: Upload Photo, Signature
Step 3: Make Payment of Fee
Step 4: Print Confirmation Page
Watch the Complete Video of How to fill NEET UG 2026 Application Form:
Step 1: Registration Form
- Go to official portal of the NTA conducting authority (Link is given above).
- Click on “Registration for NEET (UG) 2026” in the candidate activity section.
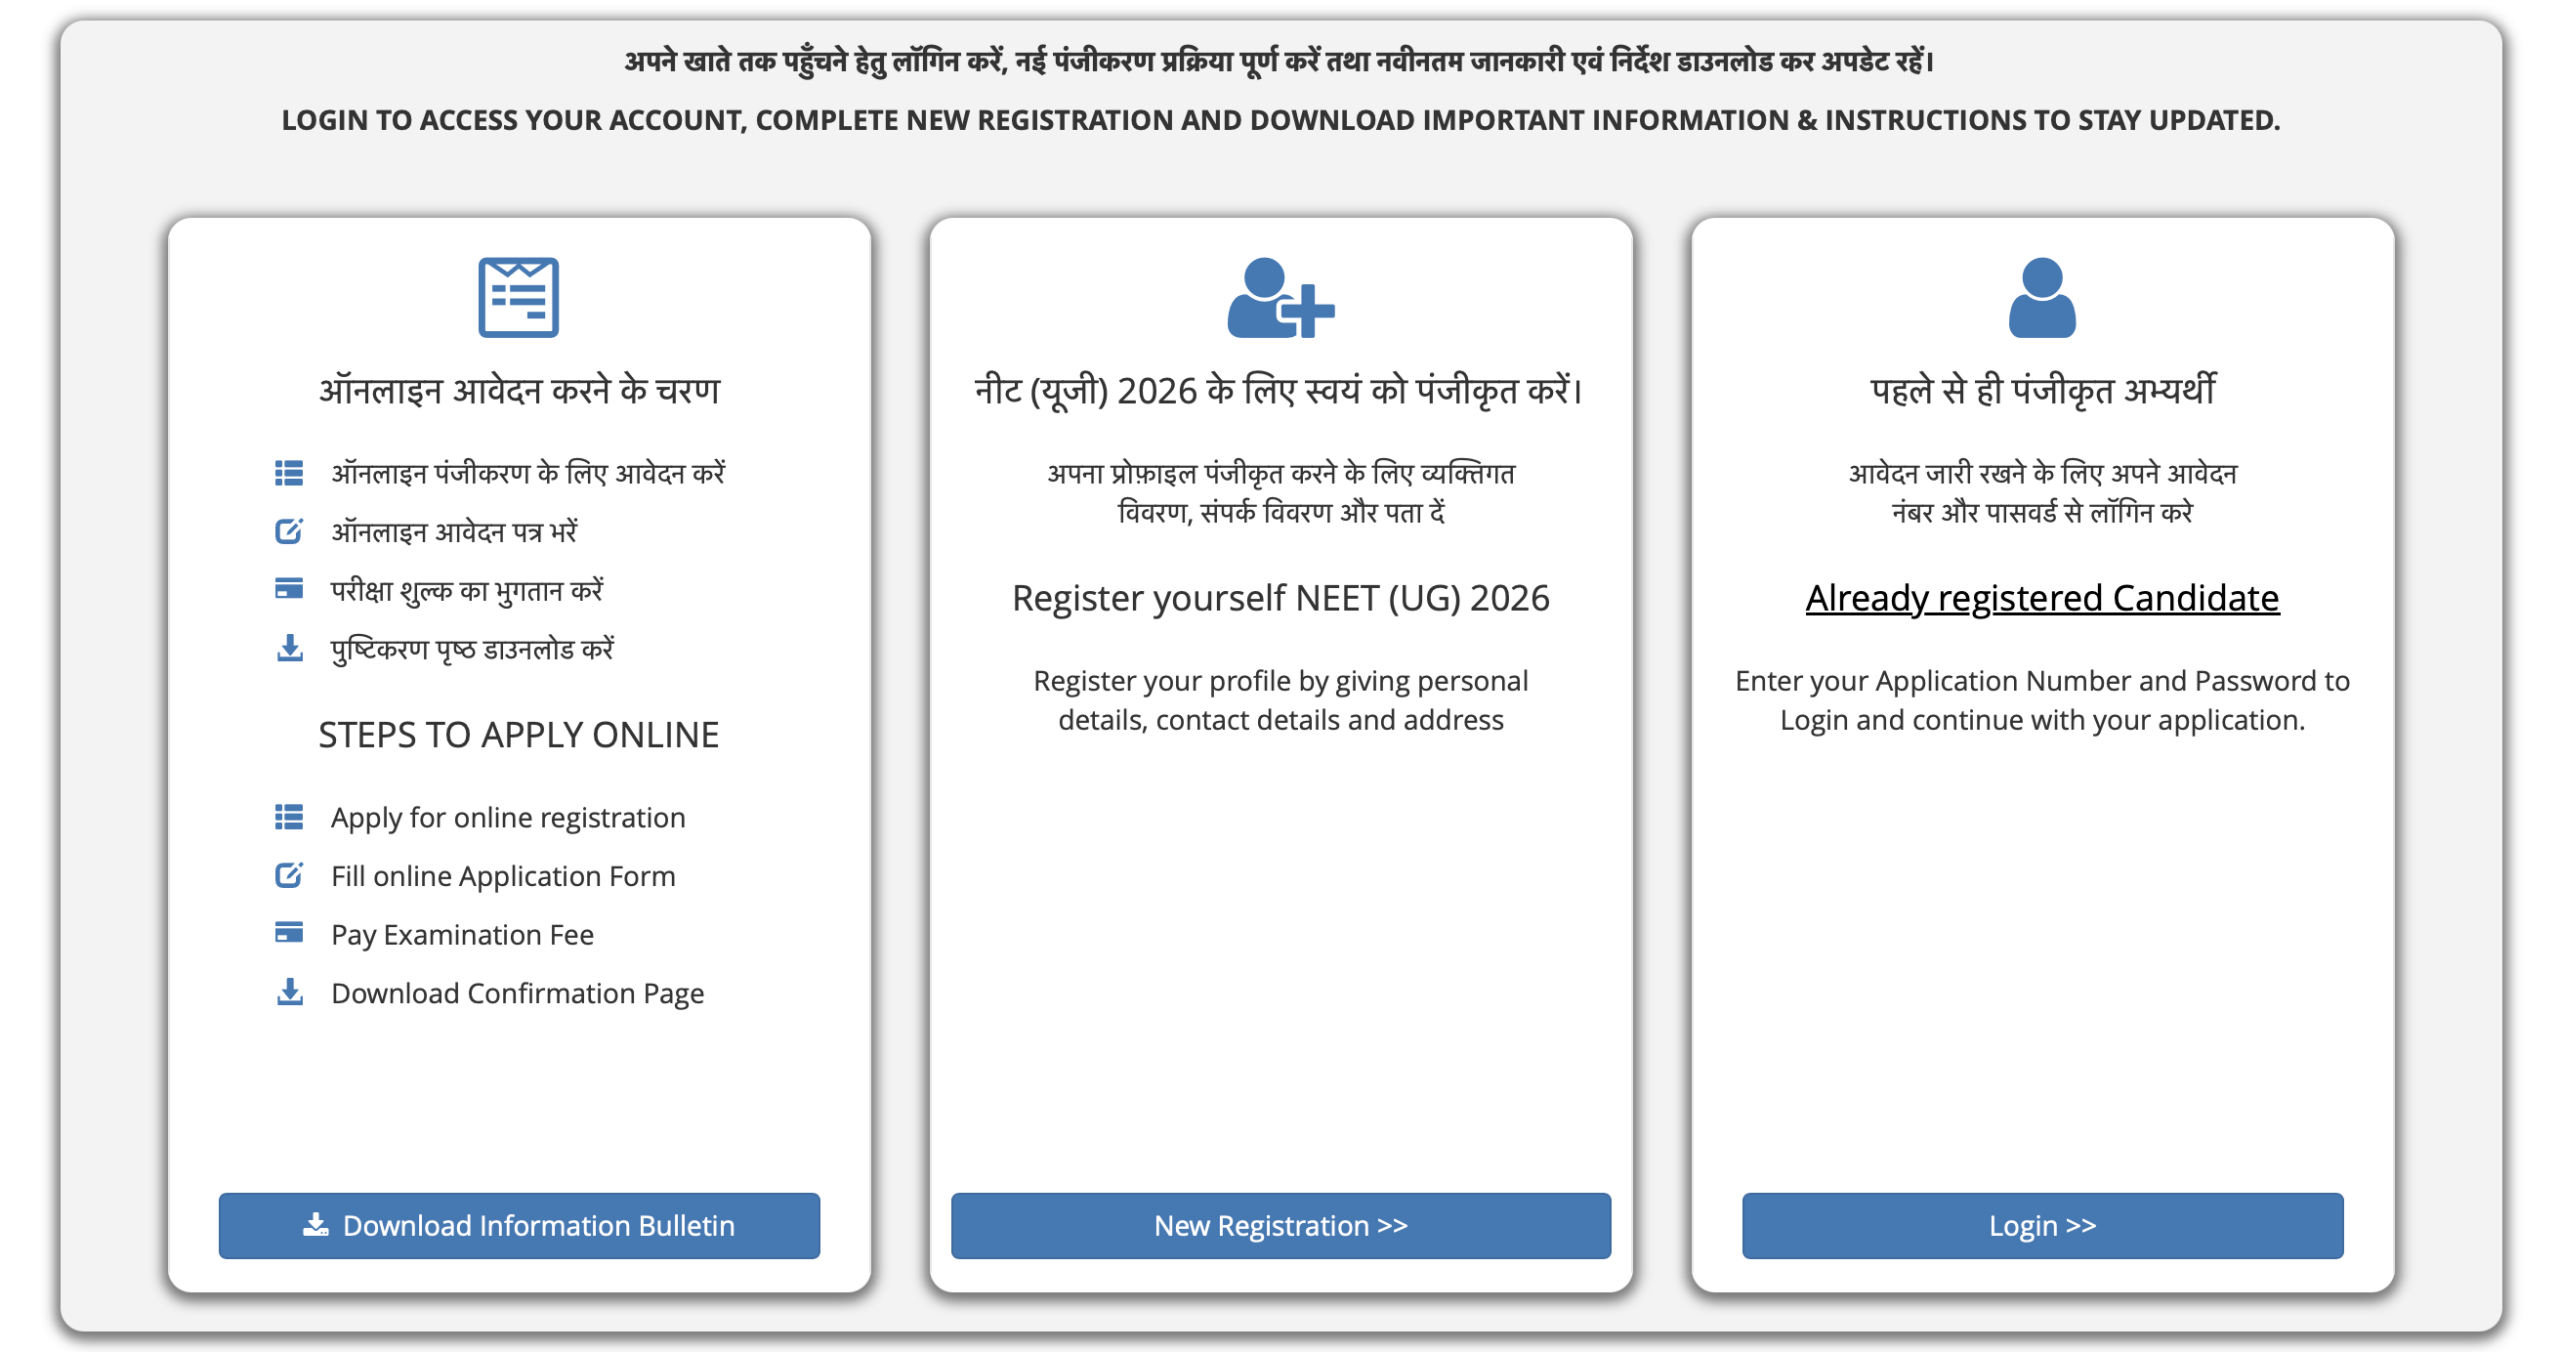
- Now click on “New Registration” button.
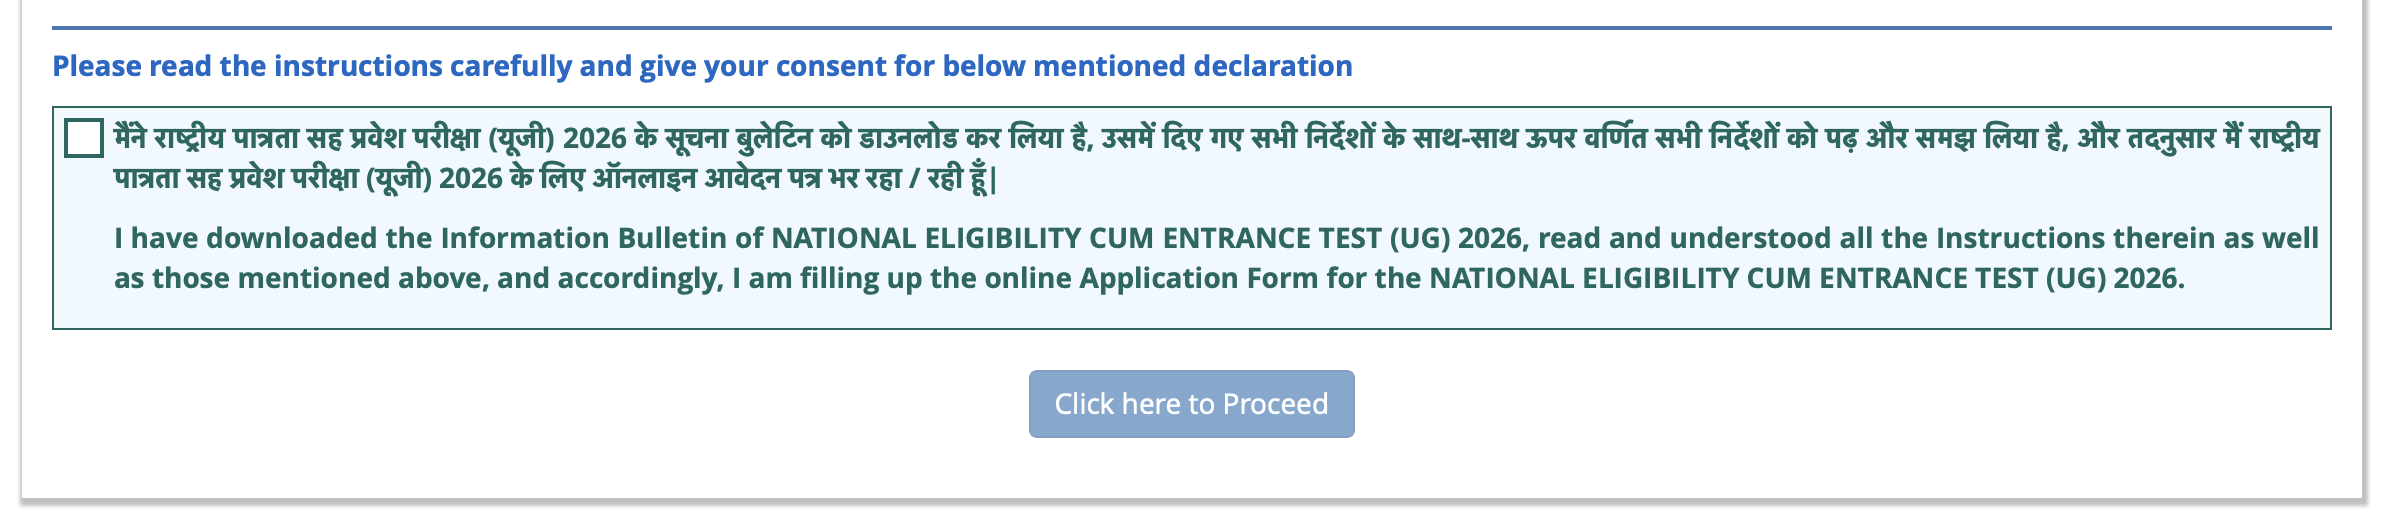
- Read all the instruction and then click on “Click here to Proceed”.
Step 2: New Registration
- Fill out the personal, parent & other details carefully.
- Candidates have to fill in their name, Mother’s Name, Father’s Name, Category, Date of Birth, Gender, Nationality, Address,, Country, State, District, Pin Code, Mobile Number, Email ID, etc.
- Now, choose password & security question & answer.
- Enter the Security Pin as given below.
- After filling in all the details, Click on the “Submit” button.

- Now, verify your details.
- If information correct, Tick the check box.
- Click on “Submit & Send OTP to verify Mobile Number” button, otherwise go for “Edit Registration Form” button.
- Now enter OTP & verify your mobile number.
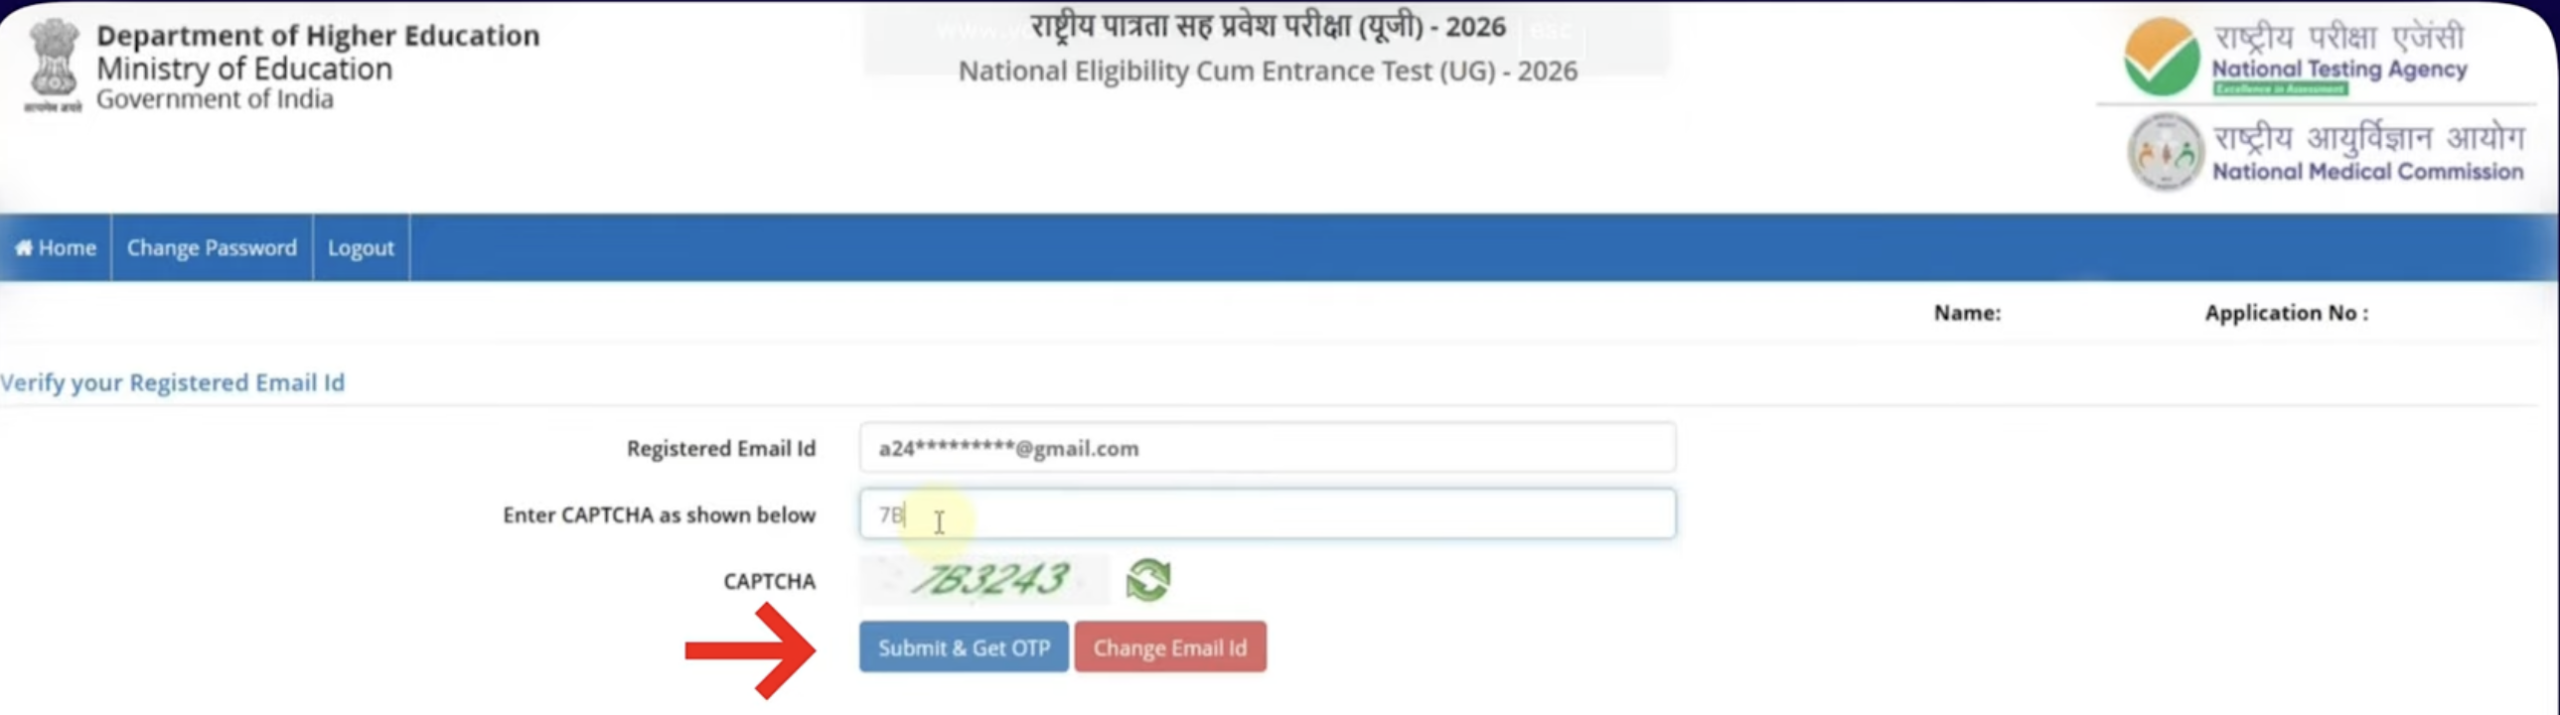
- After verifying mobile number, candidates also have to verify the Email Address.
- Now, the application number will be generated. Note down & keep it safe for further use.
Step 2: Fill Application Form Details
- Next, click on the “Fill Up Application Form” button.
- This section is divided into total 12 steps.
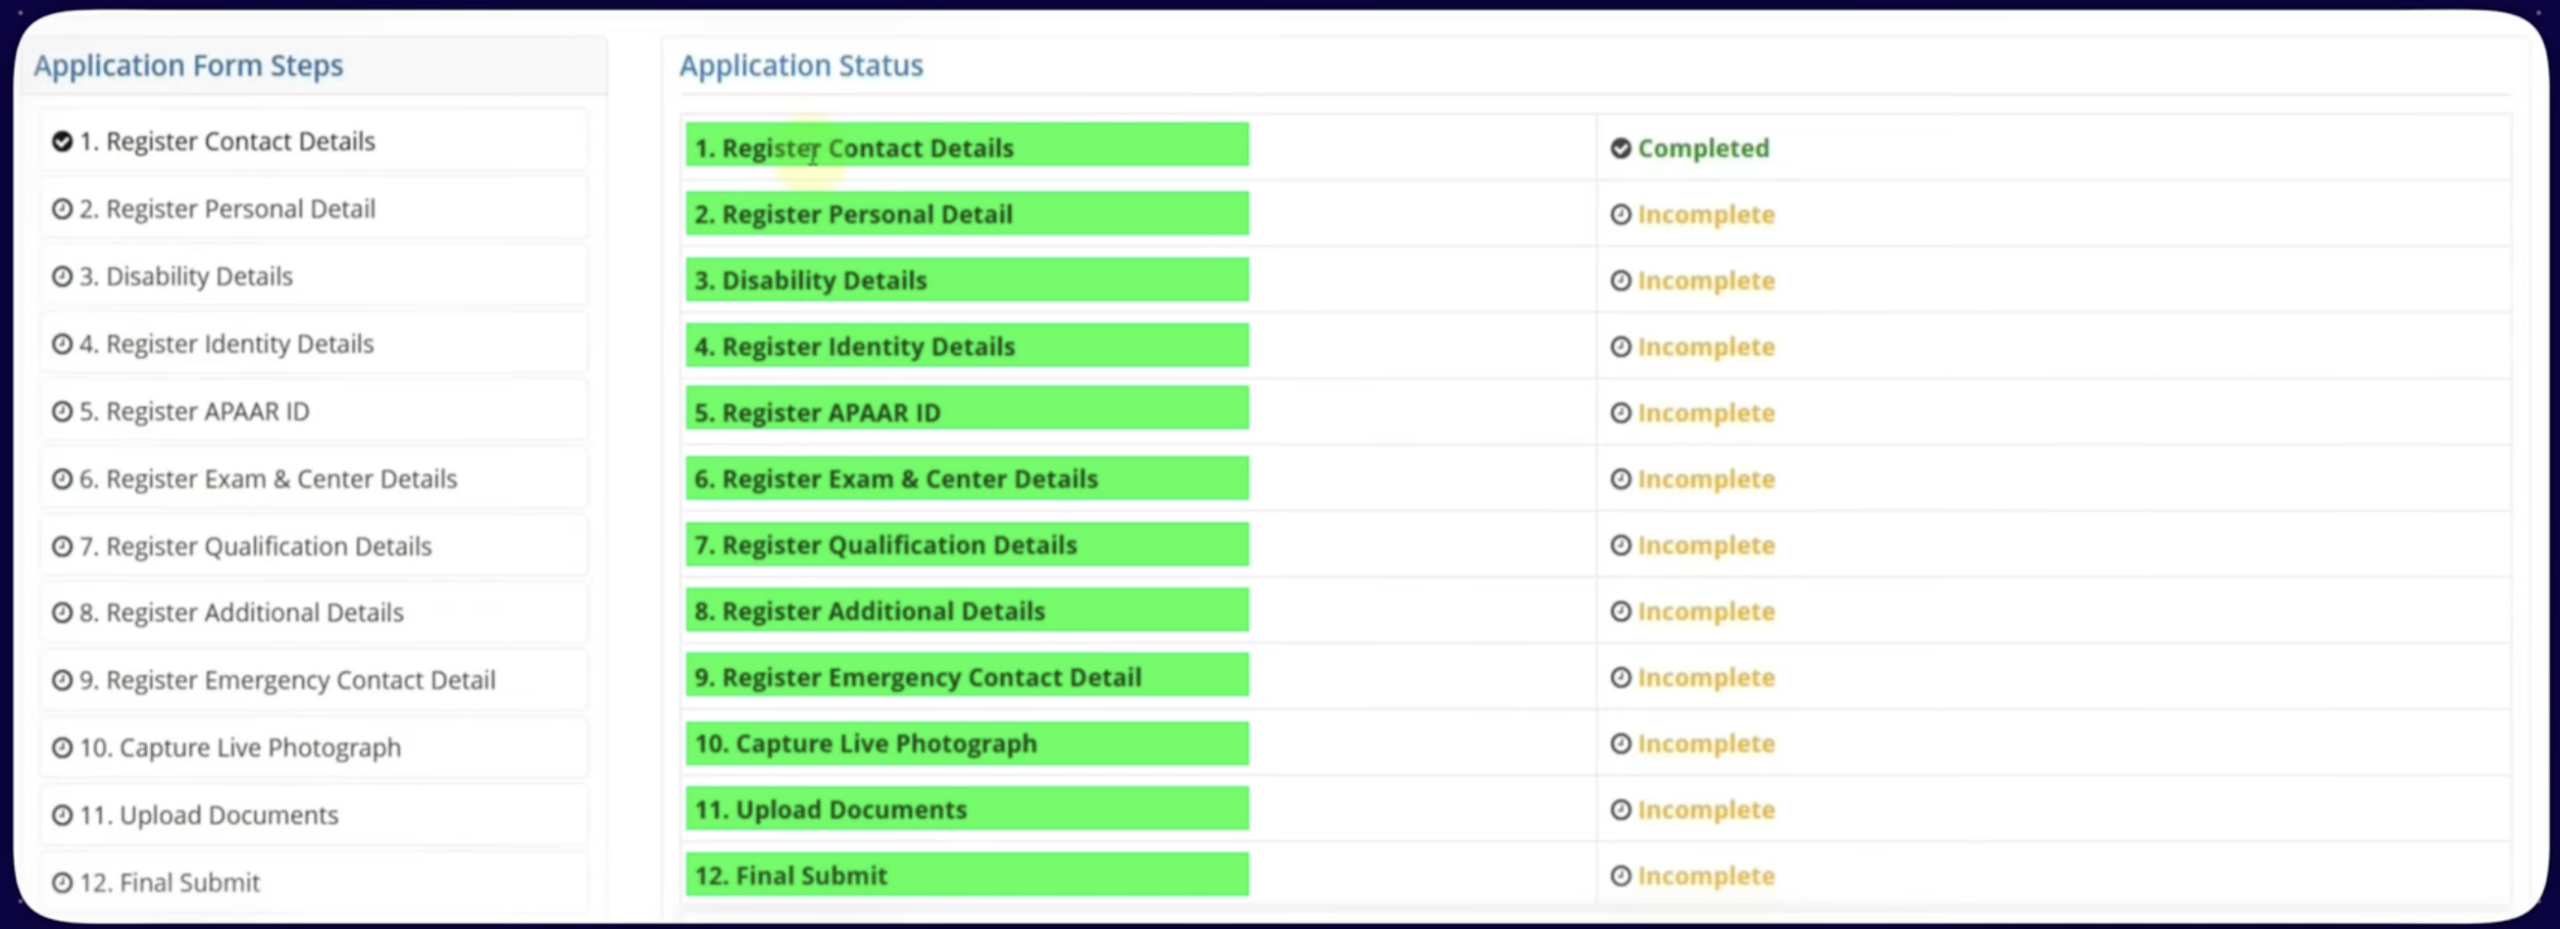
Step 2.1: Fill Personal Details
- Now fill Nationality, Category (If you are applying under any category, you have to fill the issued category certificate details), Diabetic Status, residence, minority status, family income, mode of preparation & board.
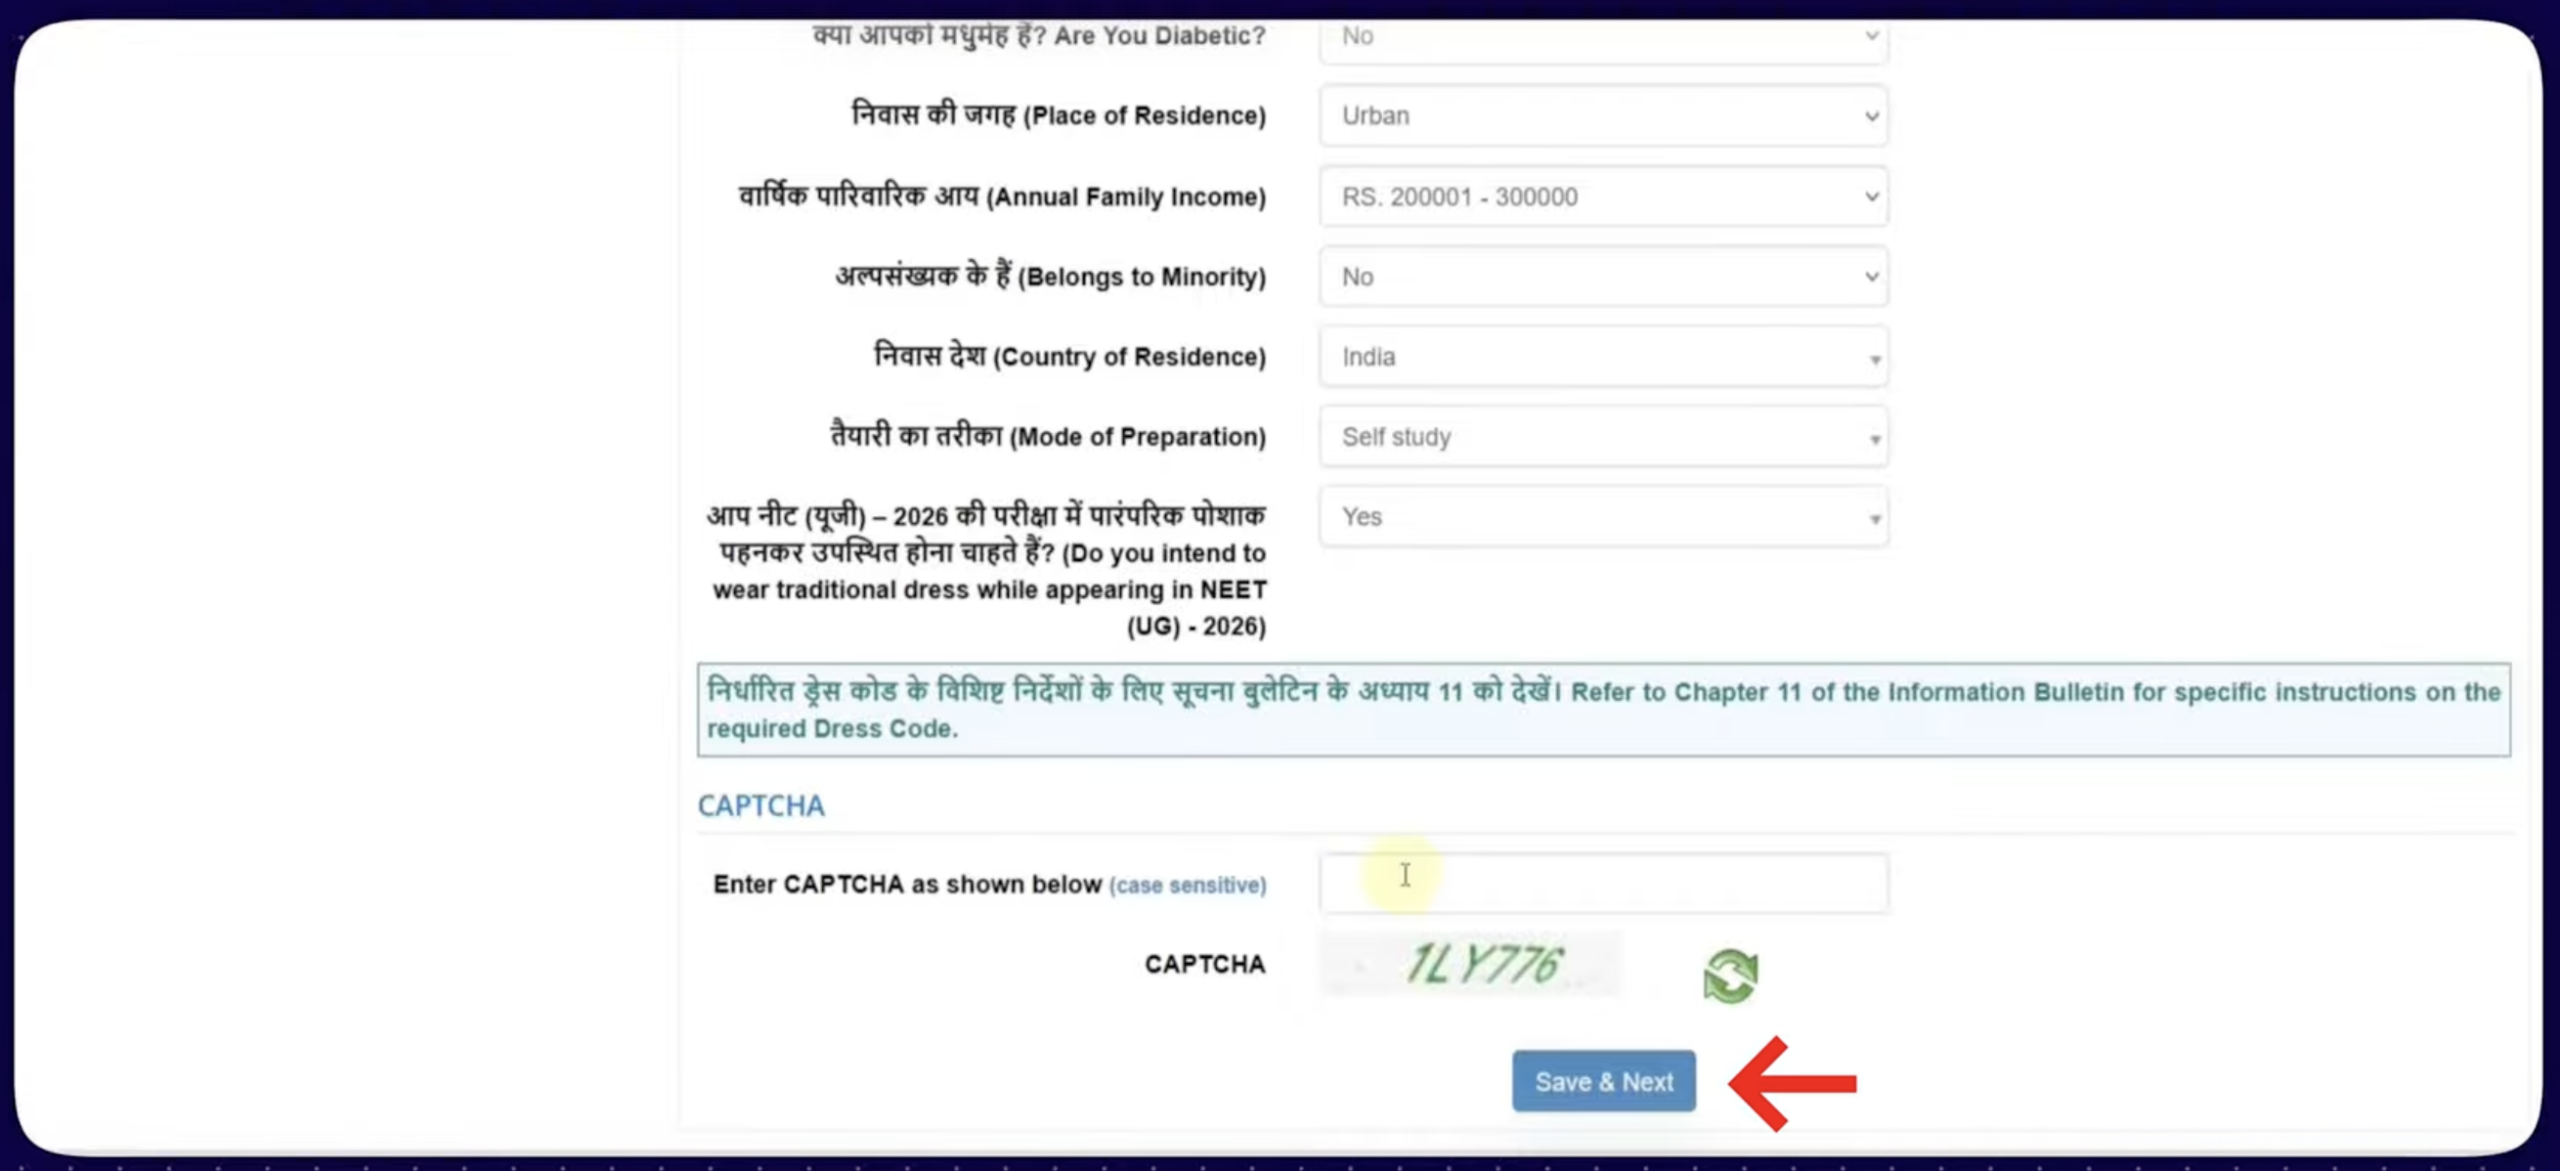
- Enter the security pin and click on “Save & Next”.
Step 2.2: Fill Disability Details
- Fill your disability/PwD status.
- If you comes under the PwD status than enter your UDID card details.
- If you are not under the PwD category than enter captcha code & click on “Save & Next” button.
Step 2.3: Fill Identity Details
- Now, go through the Aadhaar Details.
- Enter your Aadhaar Number.
- You will receive a OTP in your registered mobile number for verification.
- After verification, fill security code & click on “Submit” button.
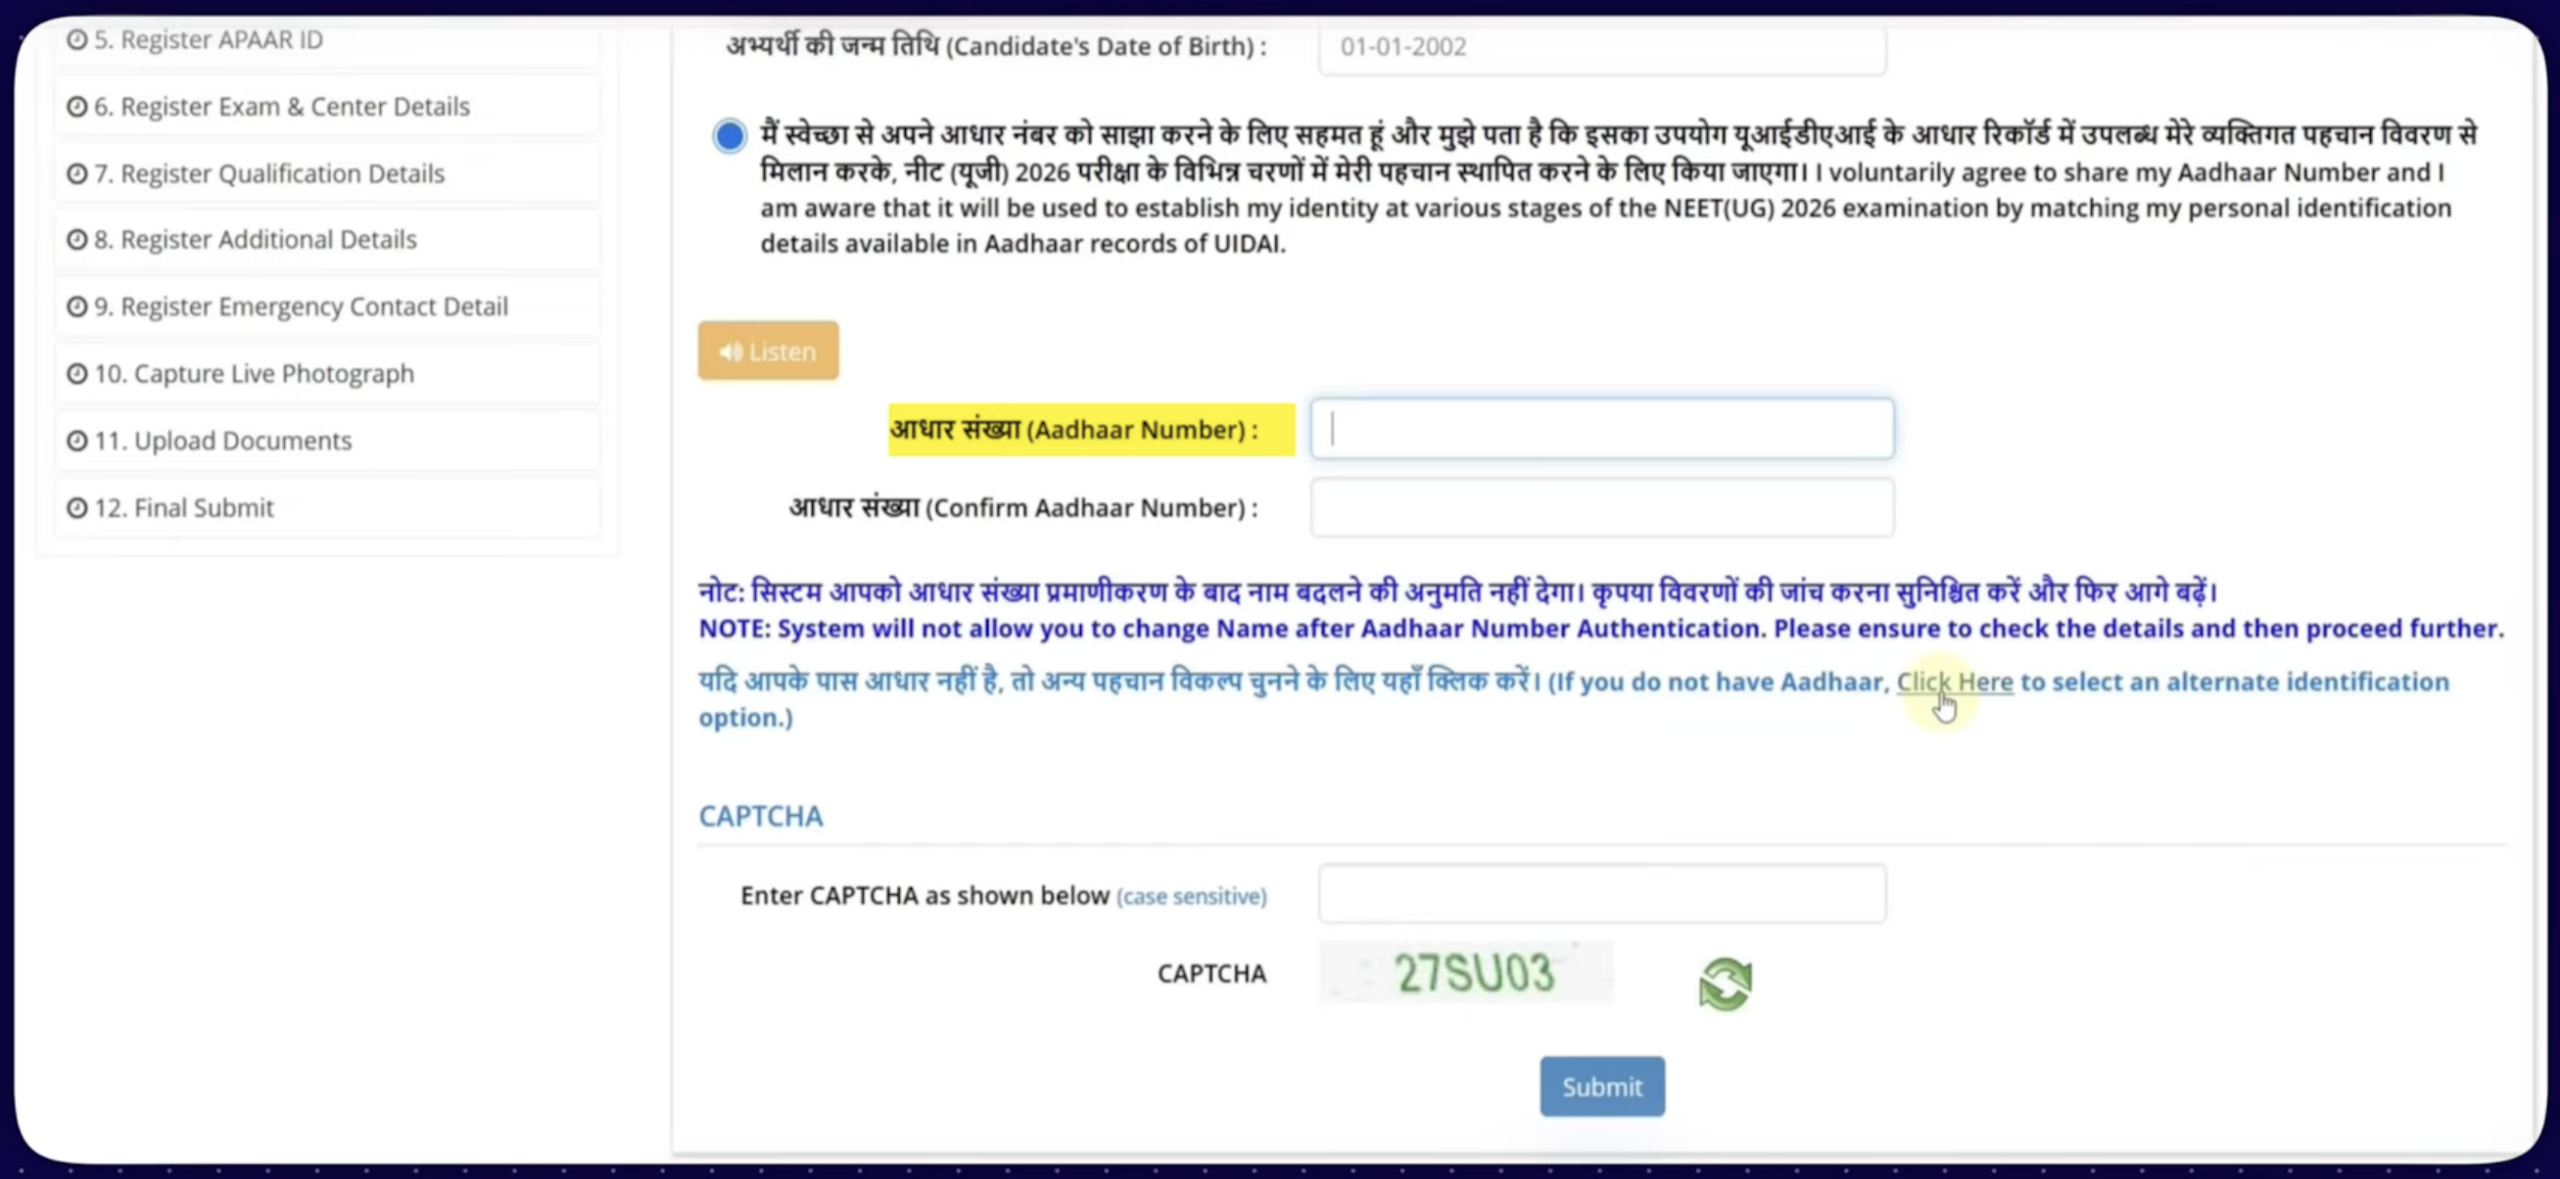
- Besides Aadhaar card, you can also use Digilocker, Passport, PAN card or any other govt. approved ID.
Step 2.4: Fill APAAR ID Details
- Enter Application Number, Candidate’s Name, Gender, DoB & APAAR ID.
- If candidate do not have APAAR ID than select No, enter the security code & click on “Submit & Next” button.
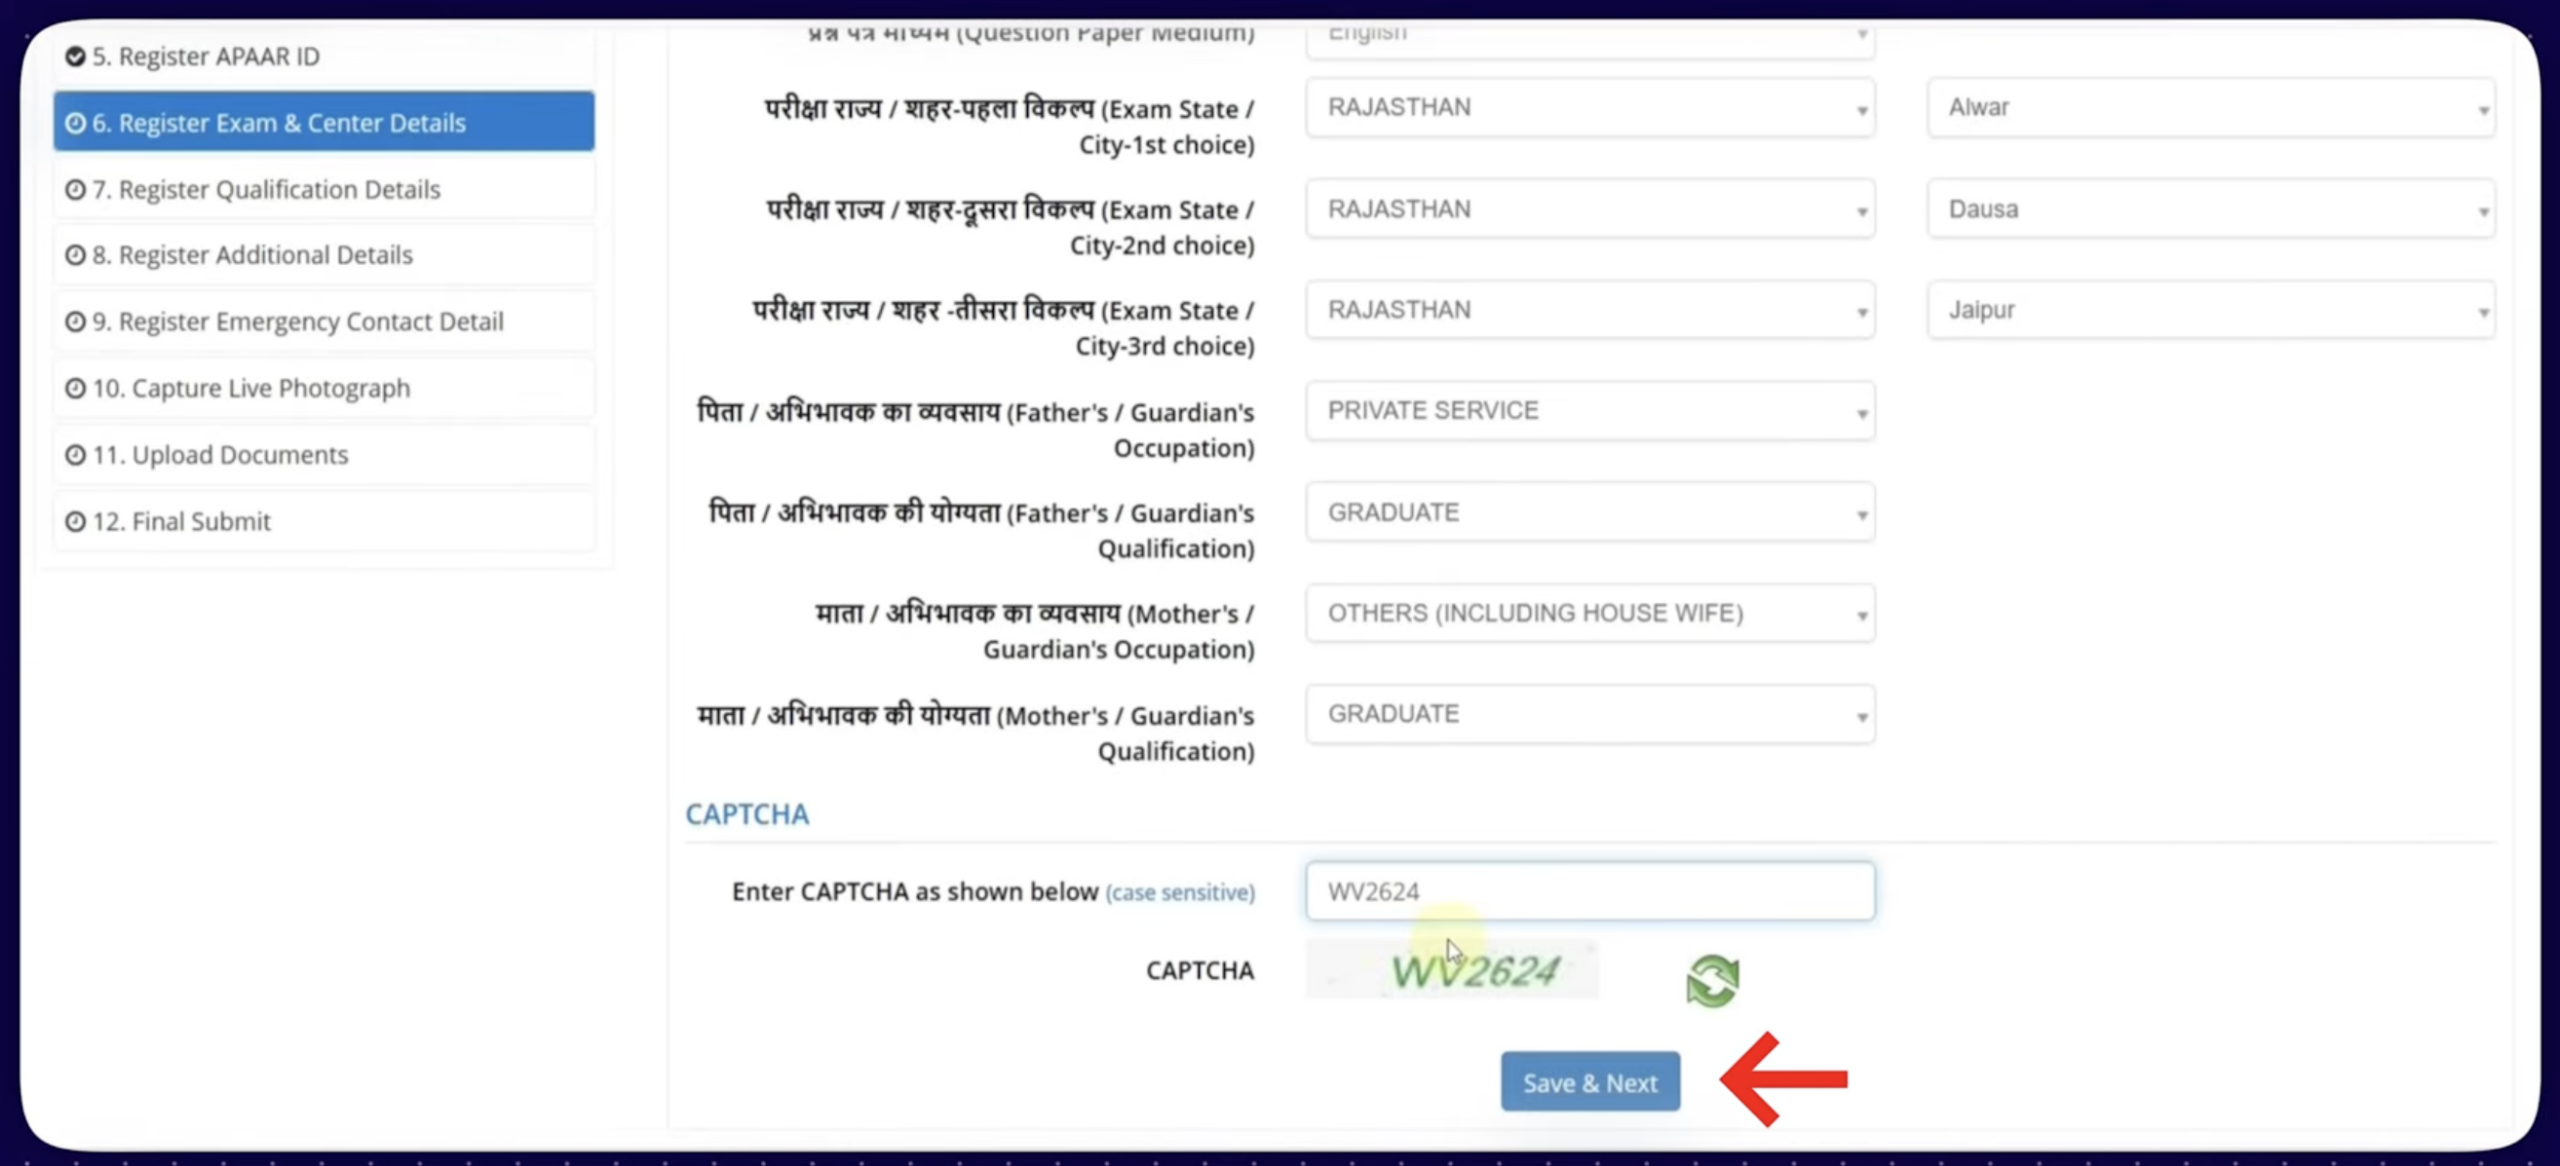
Step 2.5: Fill Exam Centre Details
- Now select the “Exam Centre Details”.
- Select the exam name, exam medium, three exam cities (As per your state), father & mother’s occupation & qualification.
- Enter the security pin.
- Click on the “Save & Next” button.
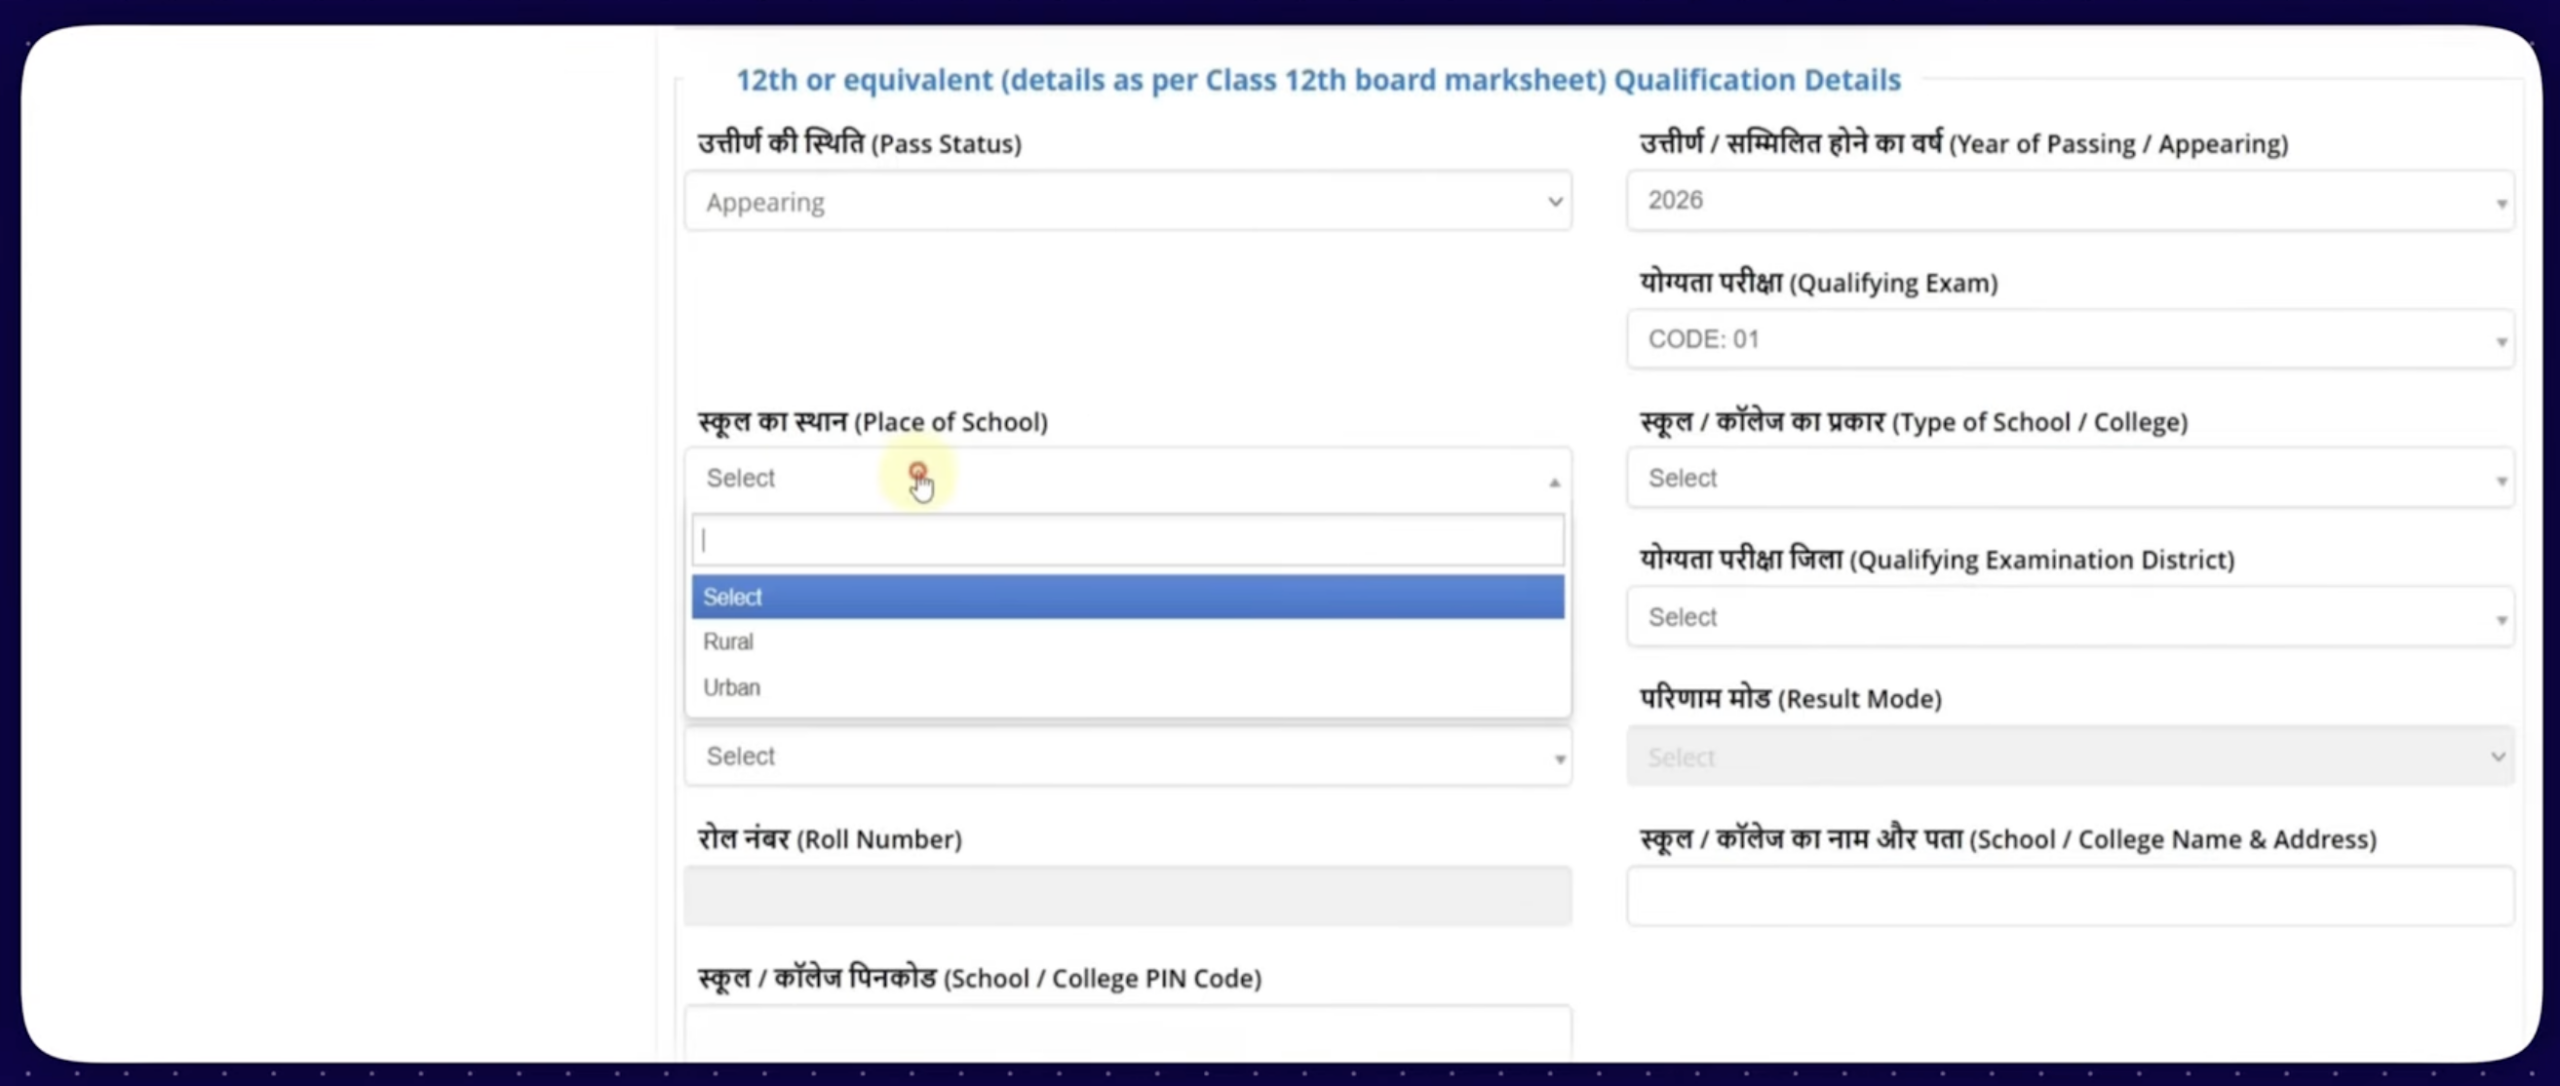
Step 2.6: Fill Qualification Details
- Go through the qualification details section.
- Fill details of 10th, 11th & 12th examination.
- Enter the security pin and click on the “Save & Next” button.
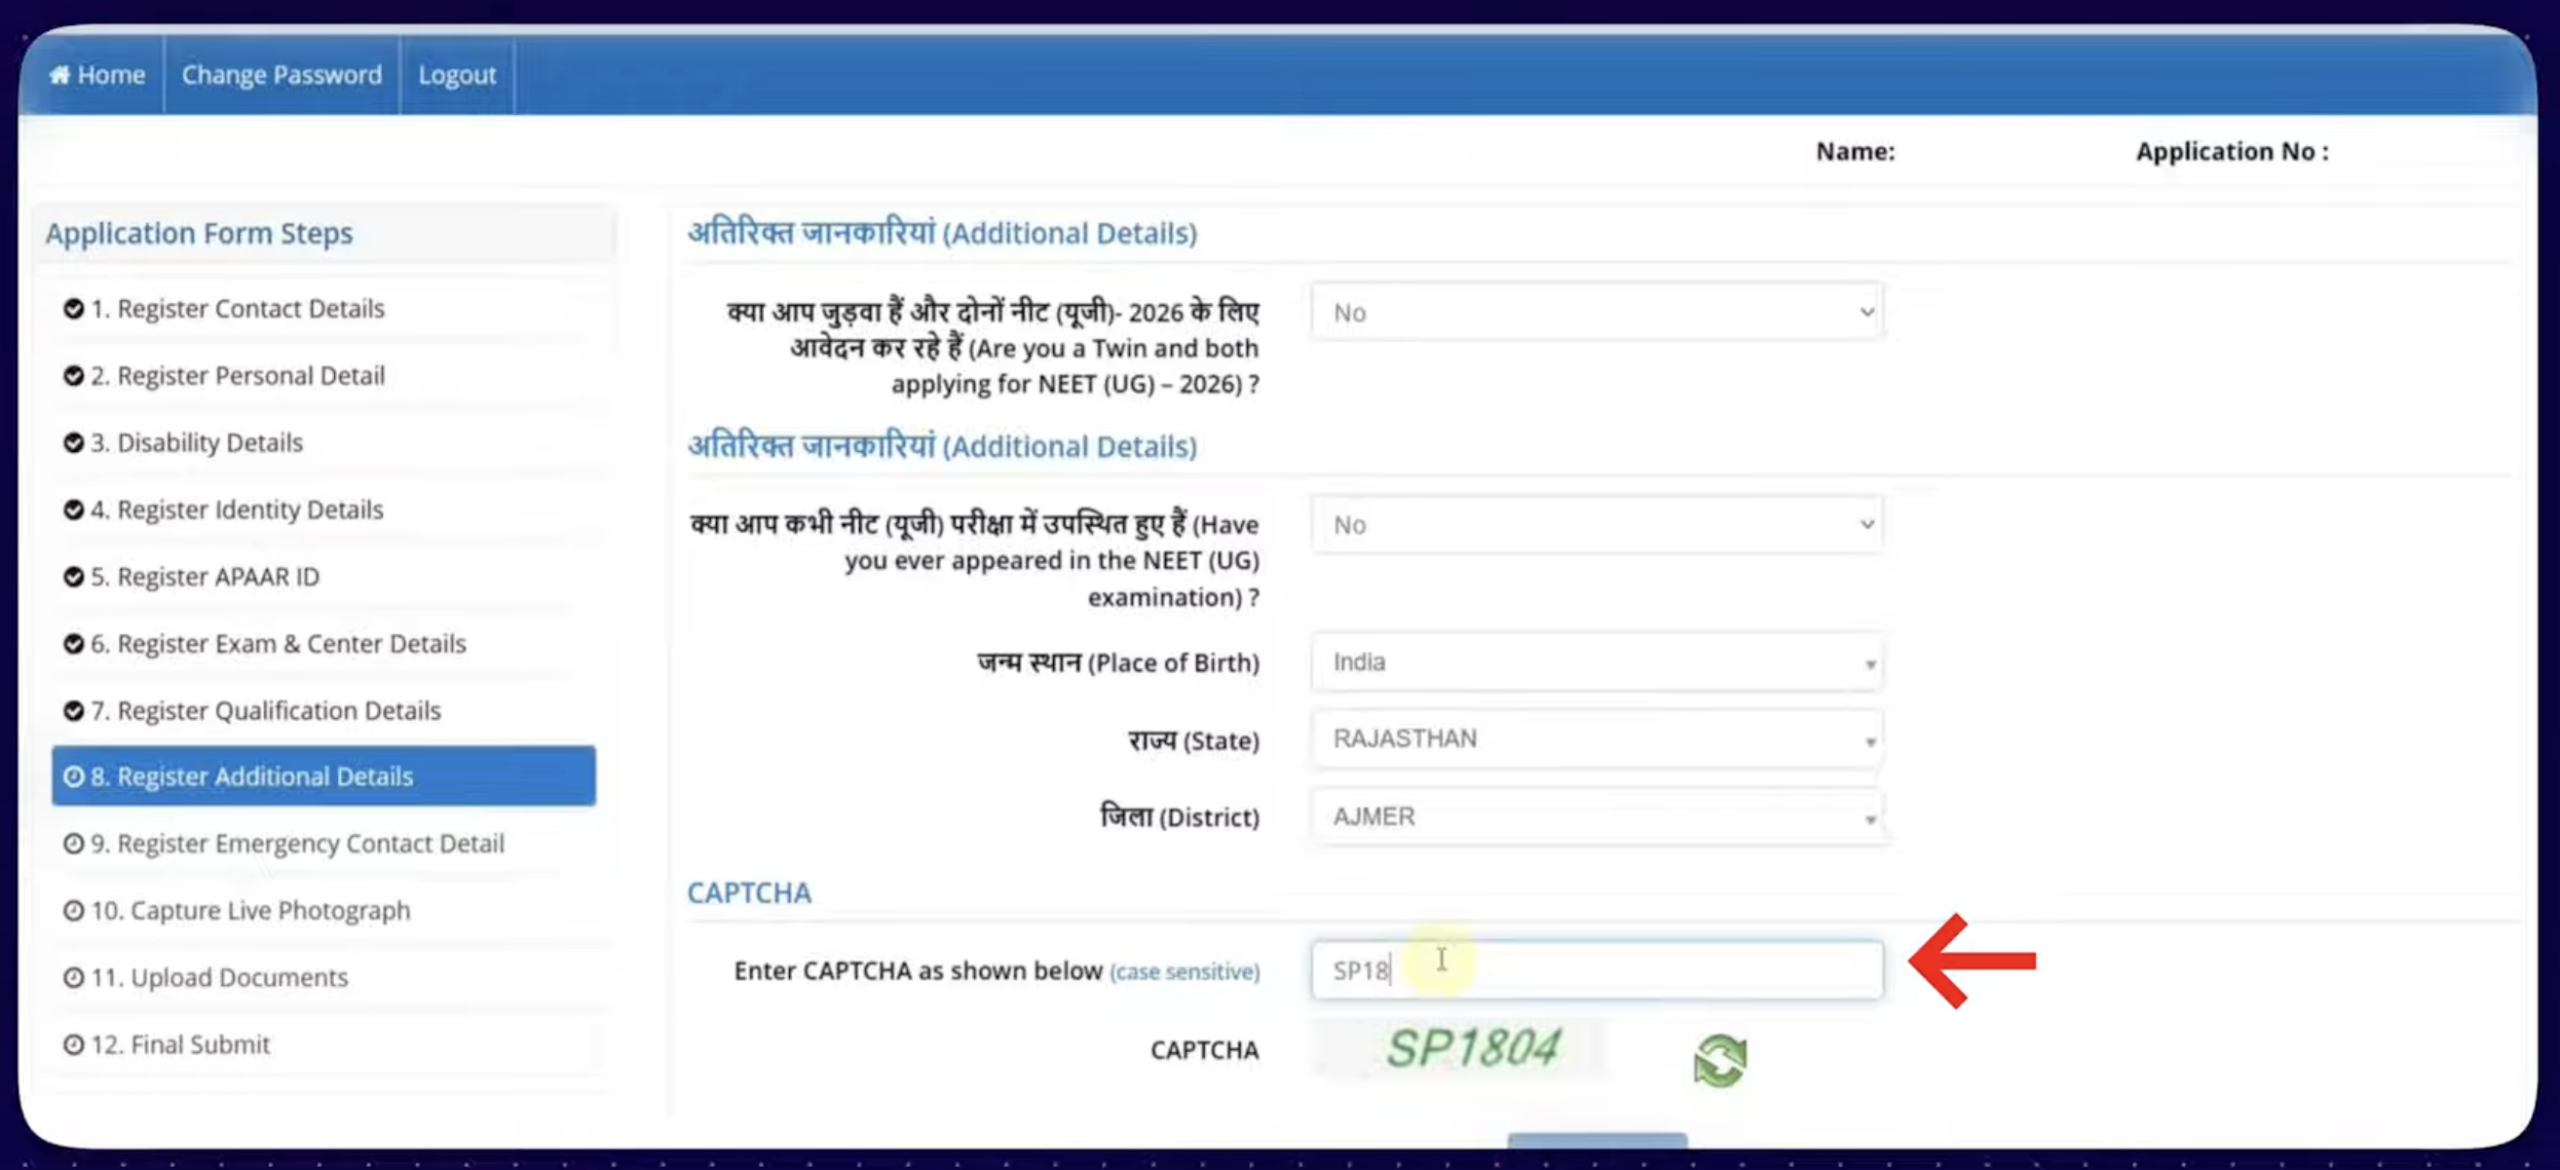
Step 2.7: Fill Additional Details
- Click on the “Fill Additional Details” section.
- Enter the required details like Are you a Twin and both applying for NEET UG, Ever apper in NEET UG exam, place of bith, state, district etc.
- Enter the security pin and click on the “Save & Next” button.
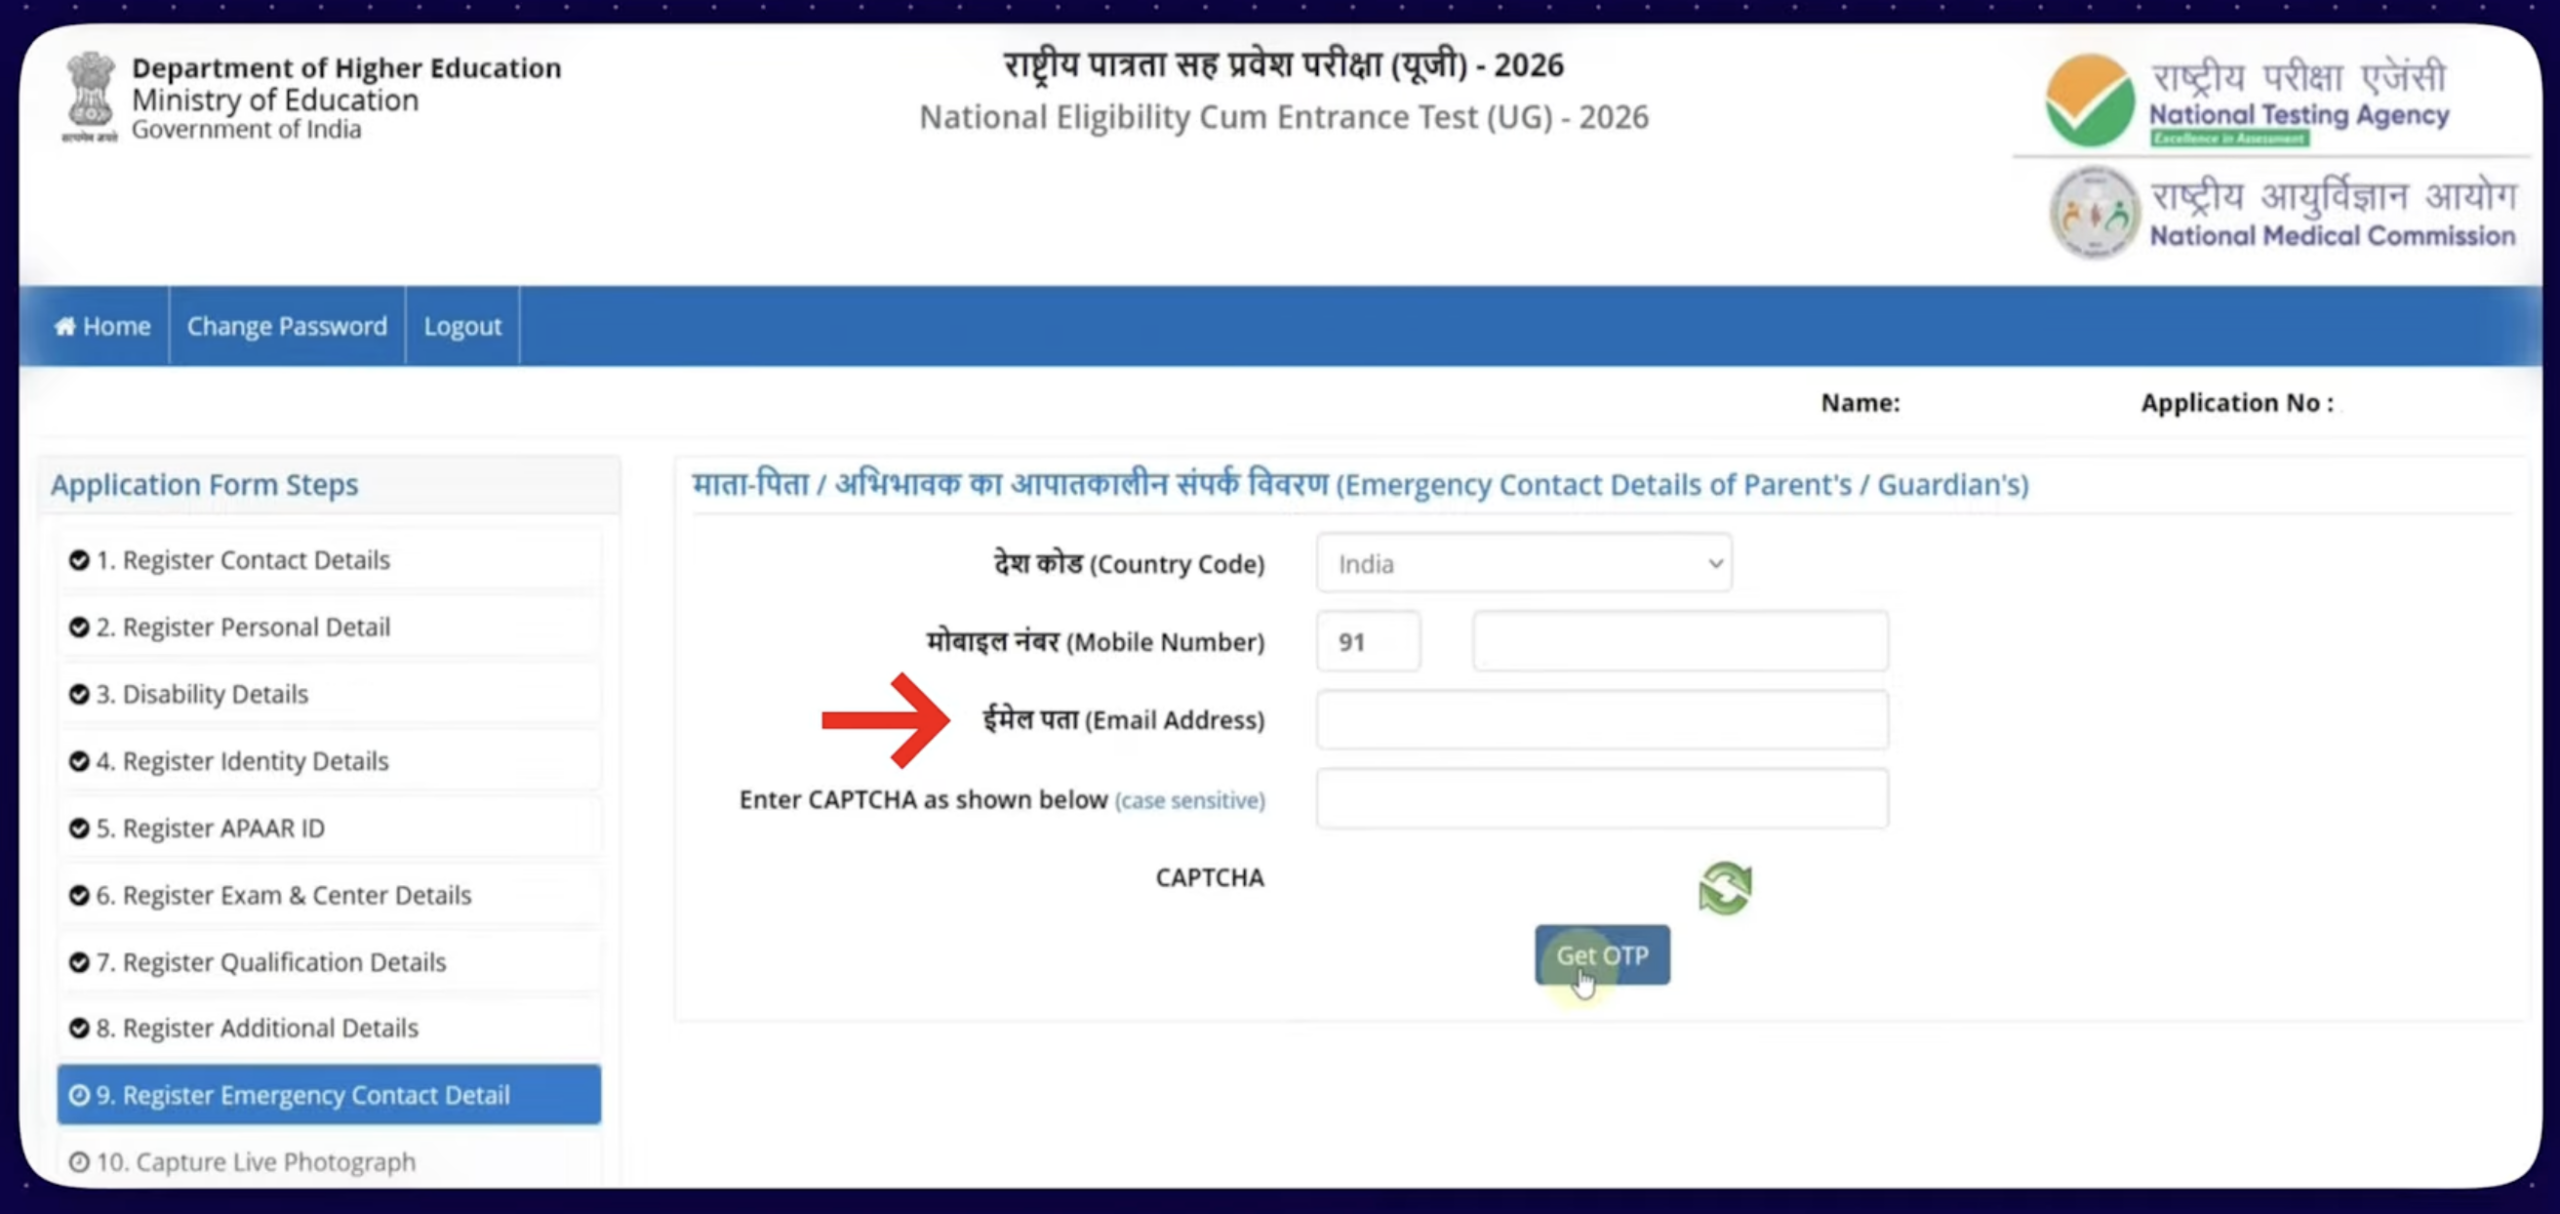
Step 2.8: Fill Emergency Contact Details
- Click on the “Emergency Contact Details” section.
- Enter the required details like country code, mobile number & email address of parent/guardian.
- Enter the security pin and click on the “Get OTP” button.
- Now, enter the OTP received through SMS and Email.
- Click on the “Verify & Next” button.
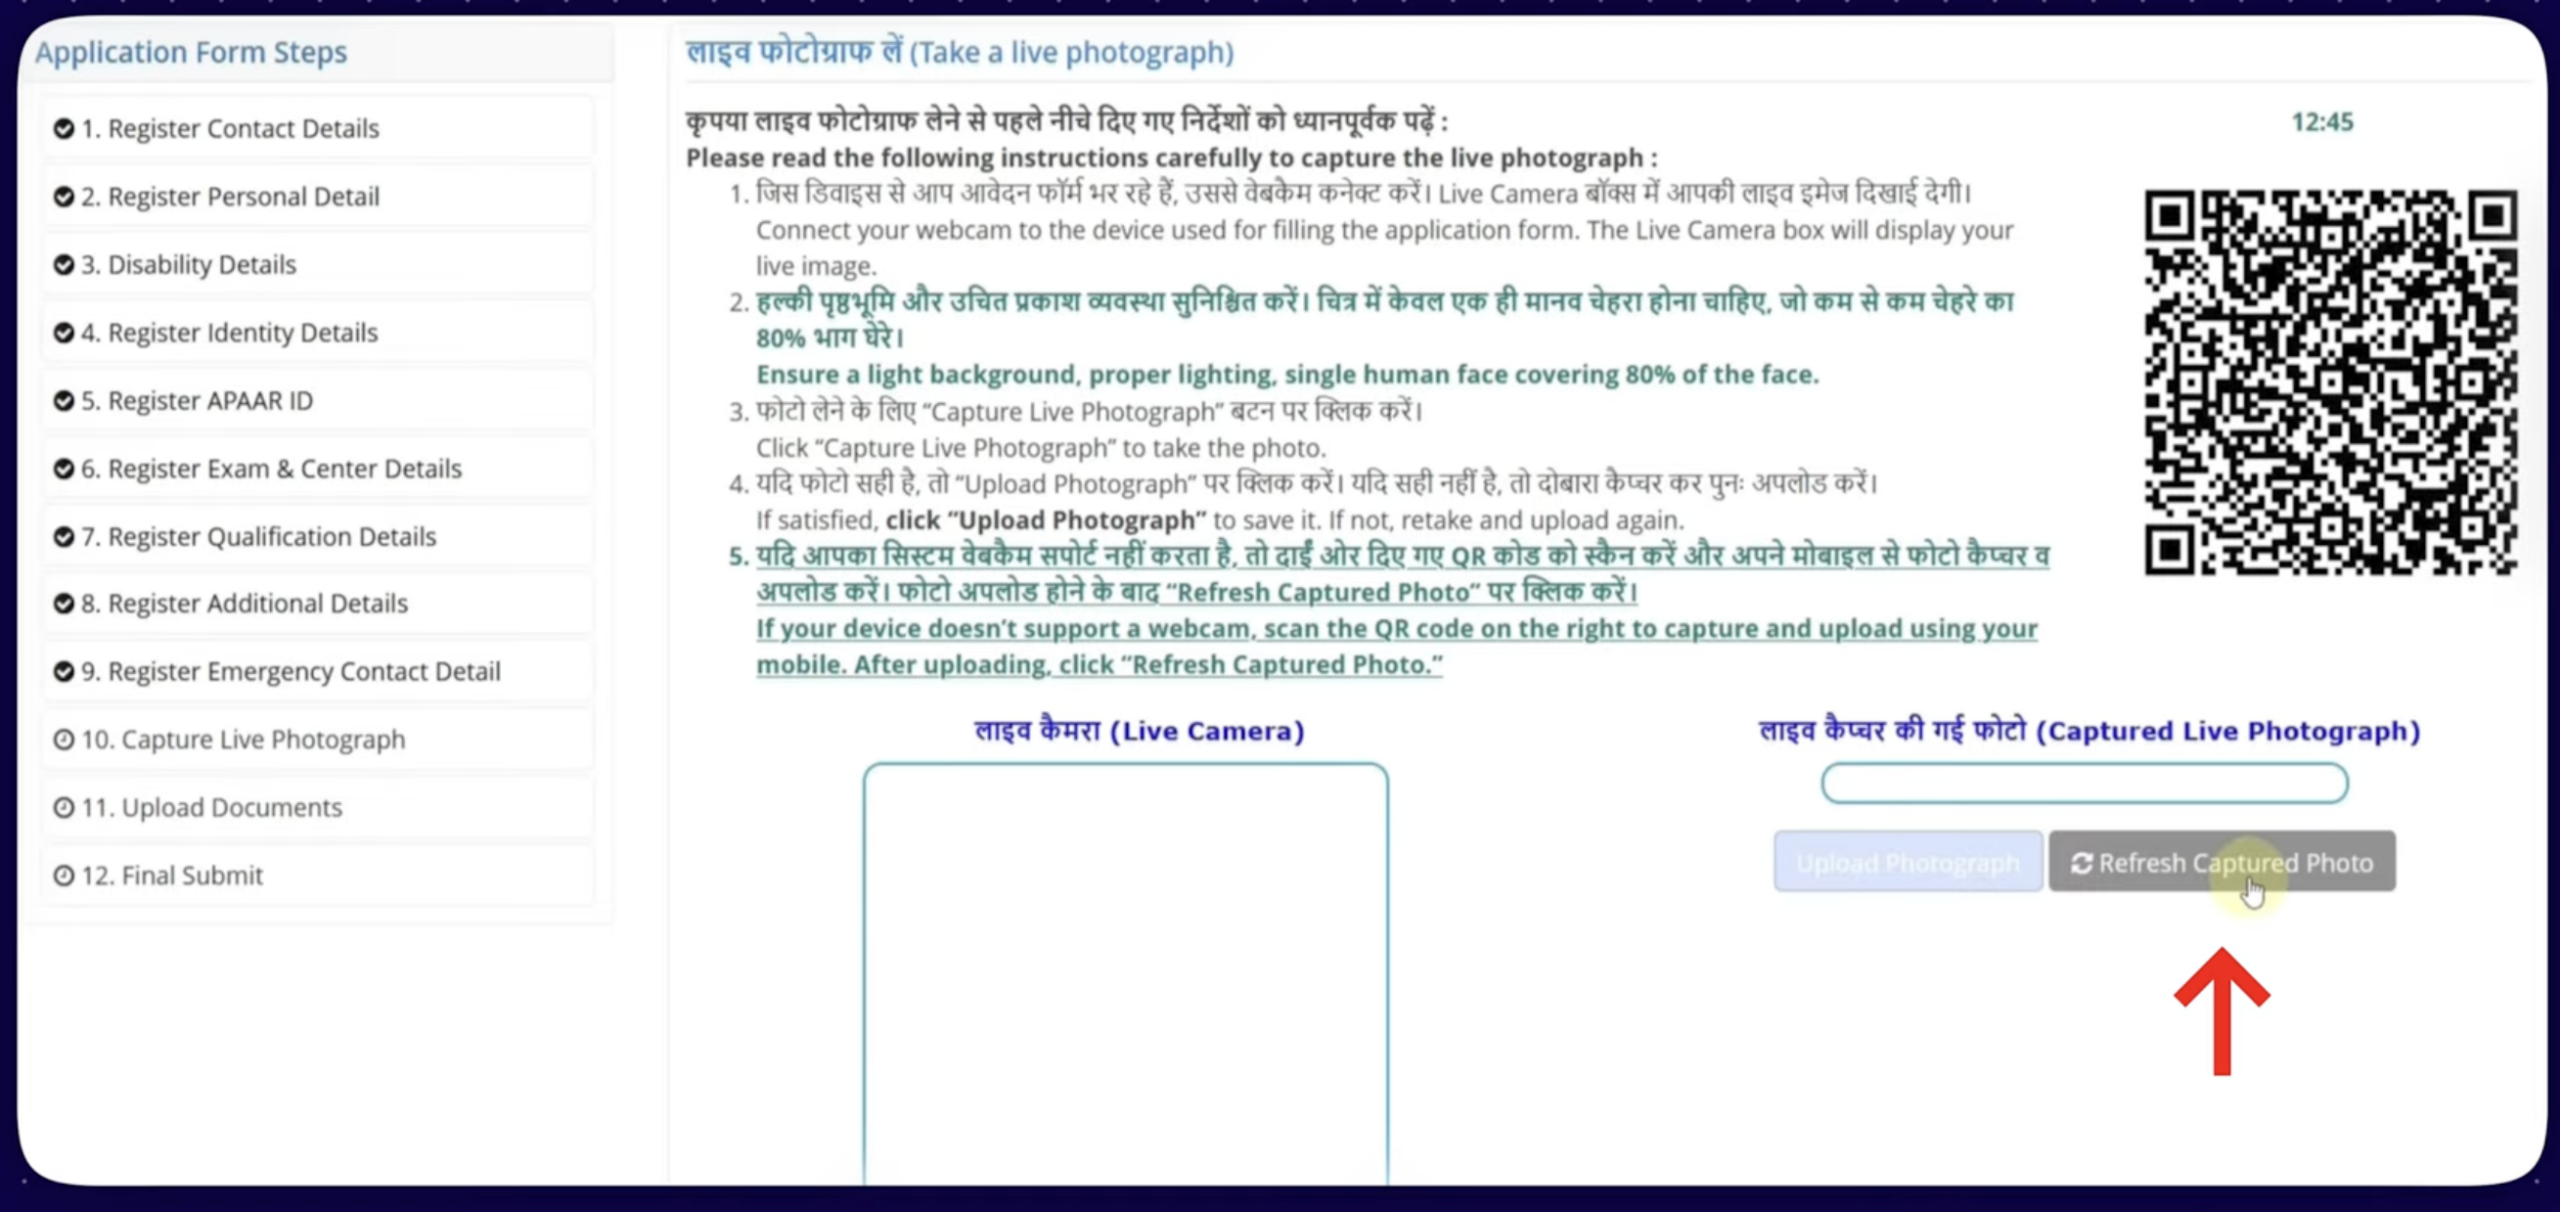
Step 3: Capture Live Photograph
- Read the instructions carefully before taking the live photograph.
- Ensure proper lighting, light background & single human face covering 80% of the face.
- Click on the “Capture Live Photograph” button.
- Scan the QR code through your mobile and take a live photograph.
- Now click on “Refresh Captured Photograph”.
- Take a preview of your photograph & Click on the “Save & Next” button.
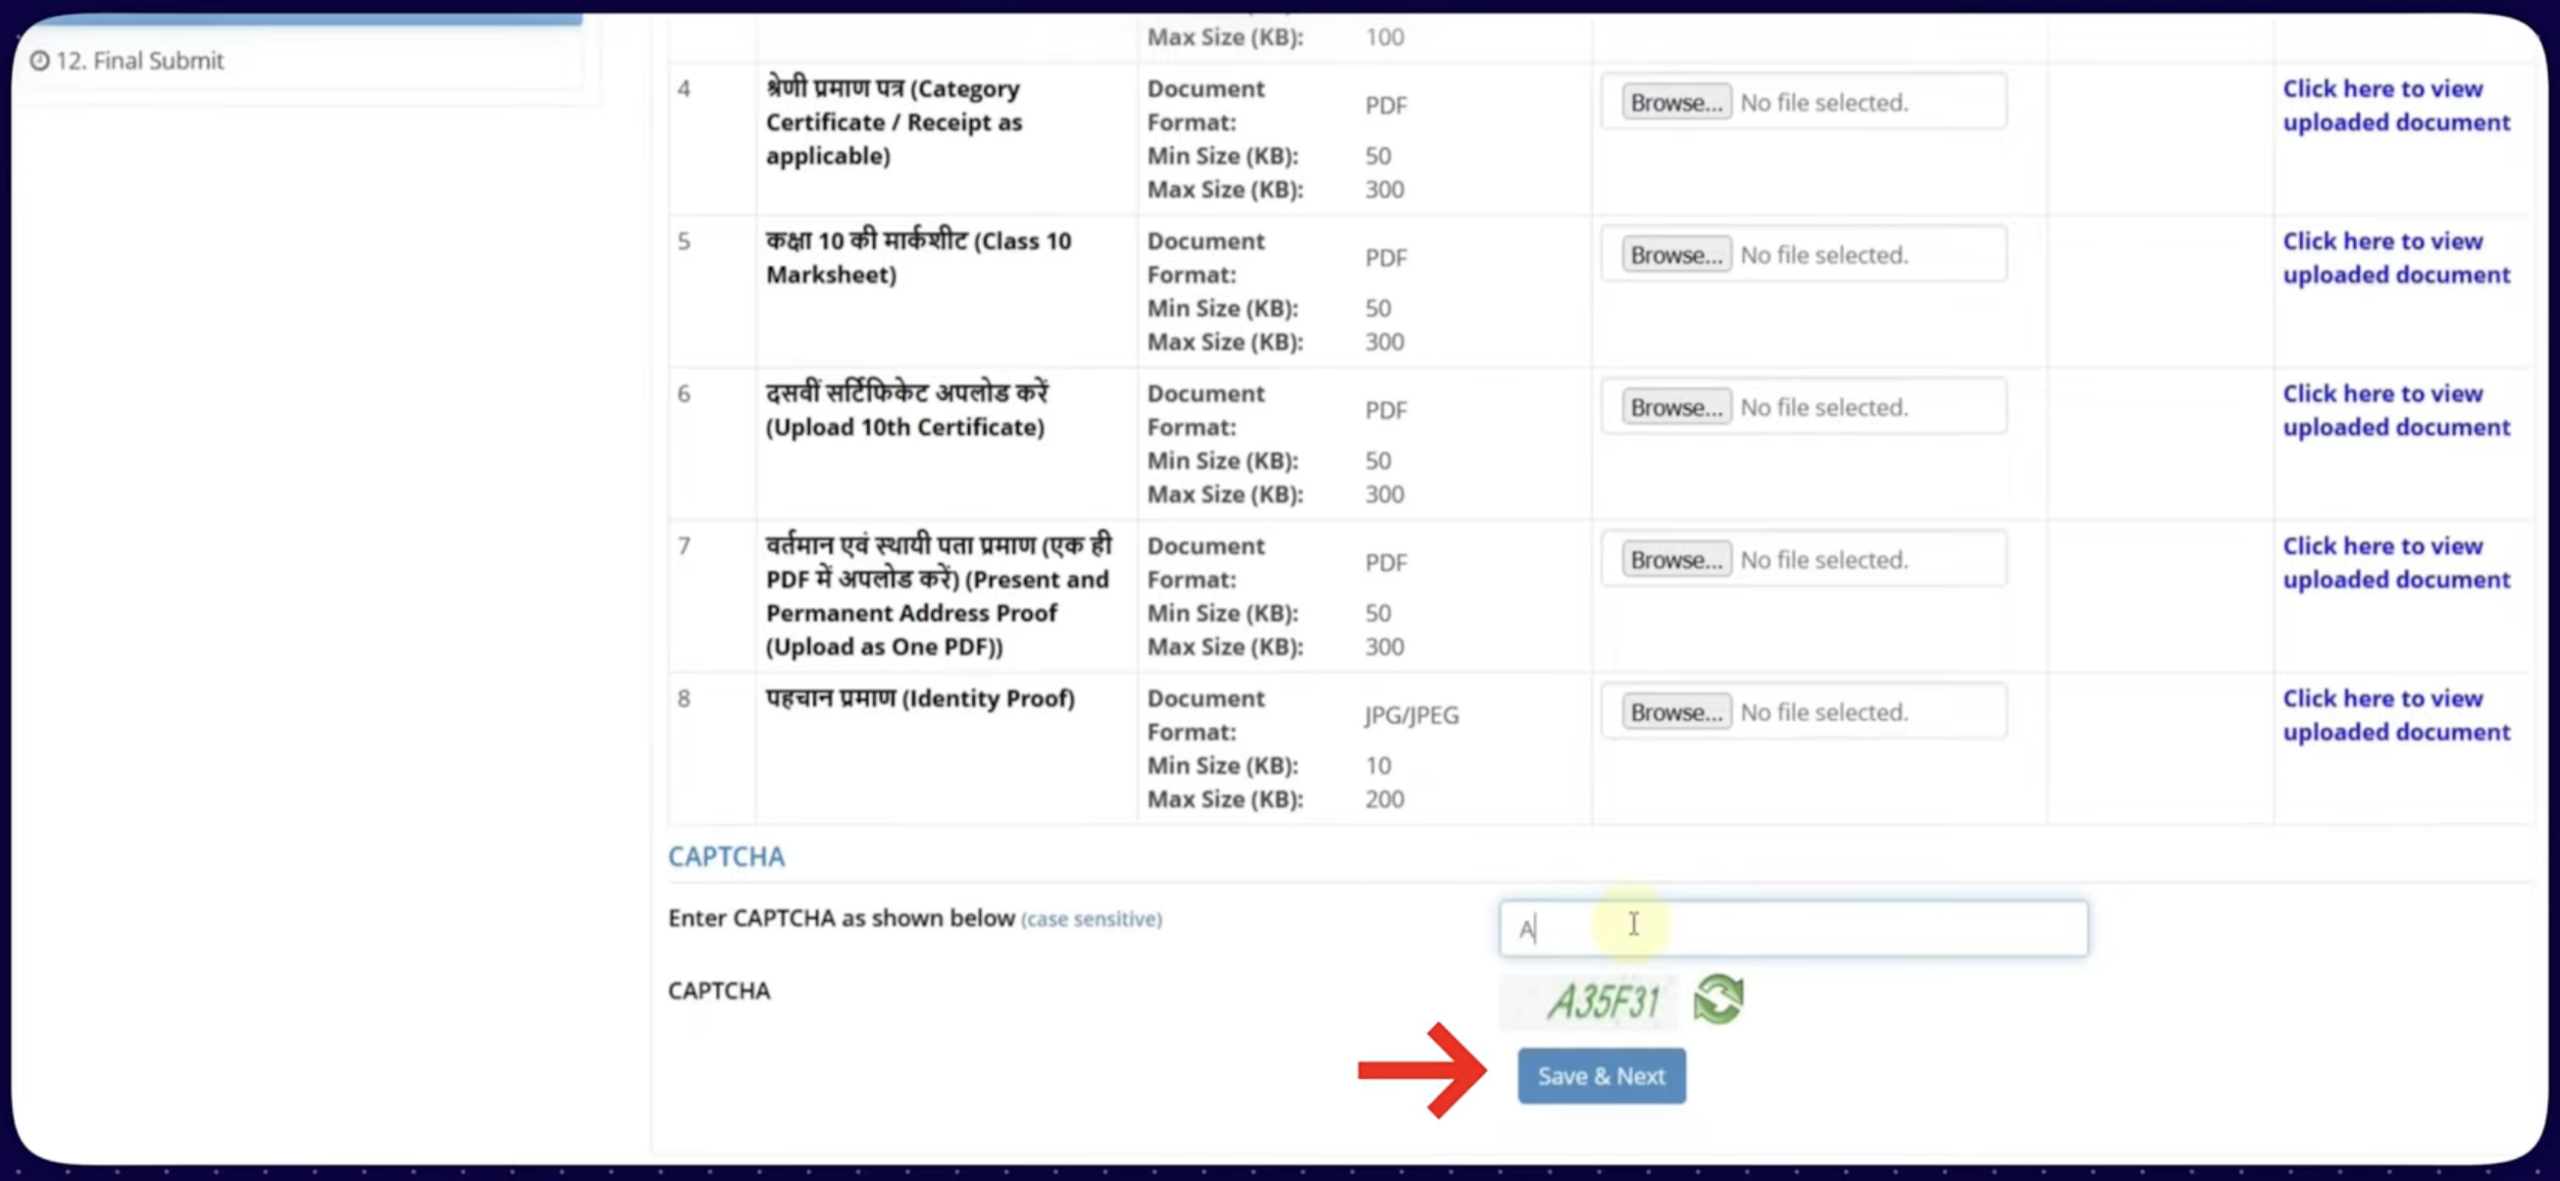
Step 4: Document Upload
- Go through the “Document Upload” section.
- Upload the scanned images of photograph, signature, fingers & thumb impression, 10th certificate & mark sheet, address proof, ID proof, and other required documents.
- The documents should be uploaded in the prescribed format.
- After uploading the documents, enter the security pin and click on “Save & Next” button.
Specifications for Images:
Candidates can check the specifications for scanned images from below:
Photograph:
- Recent colored or back & white Passport size Photograph (size: 10 kb to 200 kb)
- Spectacles are allowed only if being used regularly.
- Photograph should not be with cap or goggles. The focus needs to be on face (80% face coverage, ears clearly visible, on a white background).
- Polaroid and Computer-generated photos are not acceptable.
- The photograph should be in JPG/JPEG format.
Signature:
- The candidate should put his full signature in running hand writing [not in capital letters] on white paper with a Black Ink pen and scan it for uploading.
- File size must be between 10 kb to 100 kb in JPG/JPEG format.
Left & Right Hand Fingers & Thumb Impression:
- The candidate should put his/her left & right hand fingers and thumb Impression on white paper with Blue Ink and scan it for uploading.
- In case of any eventuality of left thumb being unavailable, right hand thumb impression may be used.
- File size must be between 10 kb to 200 kb and in JPG/JPEG format.
Class 10th Passing Certificate & Marksheet:
- The candidate should scan their Class X Passing Certificate & Marksheet for uploading.
- The image should be in PDF format.
- File size must be between 50 kb to 300 kb.
- If Marks are in CGPA, then scanned copy of Conversion / Equivalent Certificate should be in pdf format between 50 kb to 300 kb.
Category Certificate (If A:
- SC/ST/OBC-NCL/EWS candidates have to upload in PDF format.
- File size should be 50 kb to 300 kb.
Address Proof:
- Address proof of present and permanent address of candidate in PDF format.
- File size should be 50 kb to 300 kb.
- The address proof may include AADHAAR Card, Domicile Certificate, Passport, Voter ID card, etc.
- Both documents (if applicable) are same should be merged and uploaded in a single PDF file. If the Present and Permanent addresses are same, then the same document will suffice.
Step 5: Final Submit
- Moving forward to “Final Submit” section.
- Review the application carefully.
- Click on the checkbox to verify the details.
- Tick on “I Agree” and click on the “Final Submission of Application” button.

Step 6: Application Fee Payment
- Click on the “Pay Examination Fee” option.
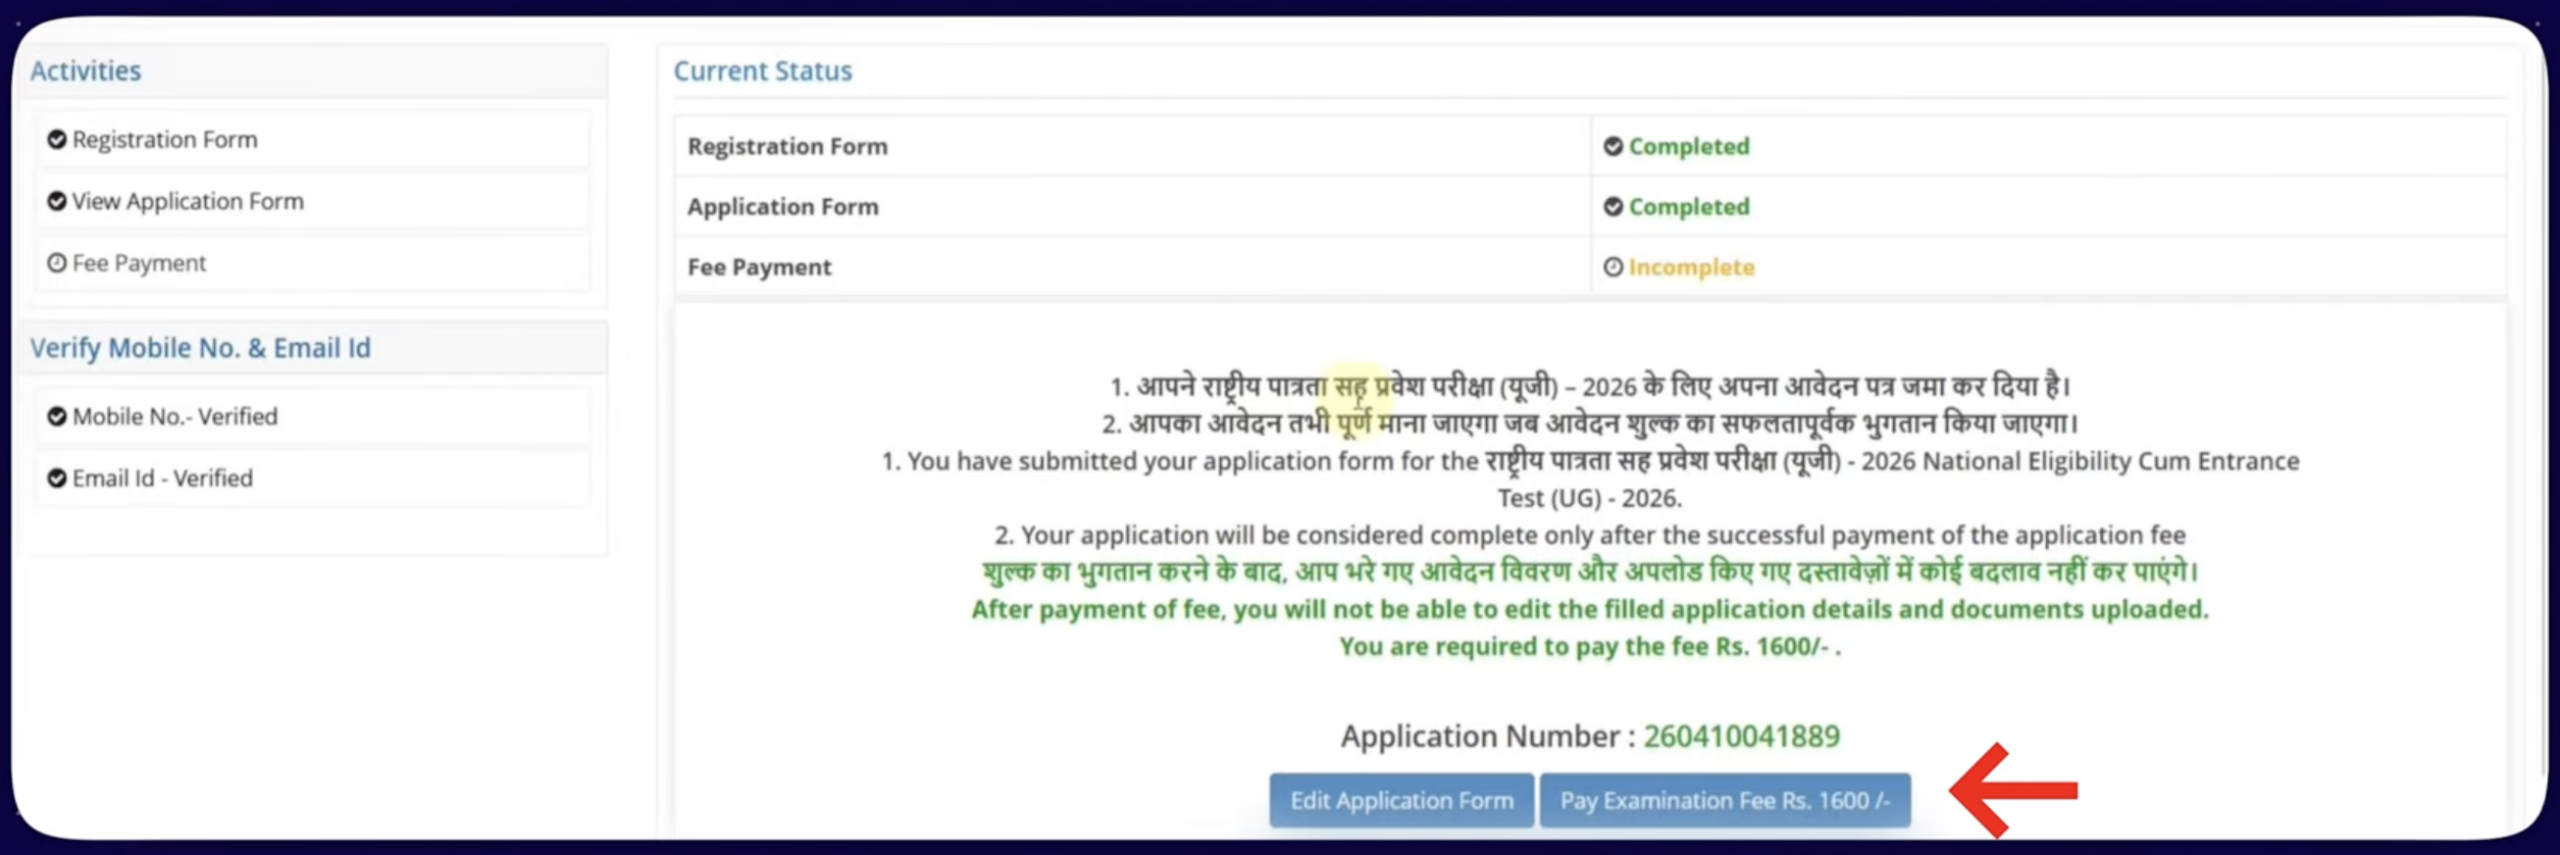
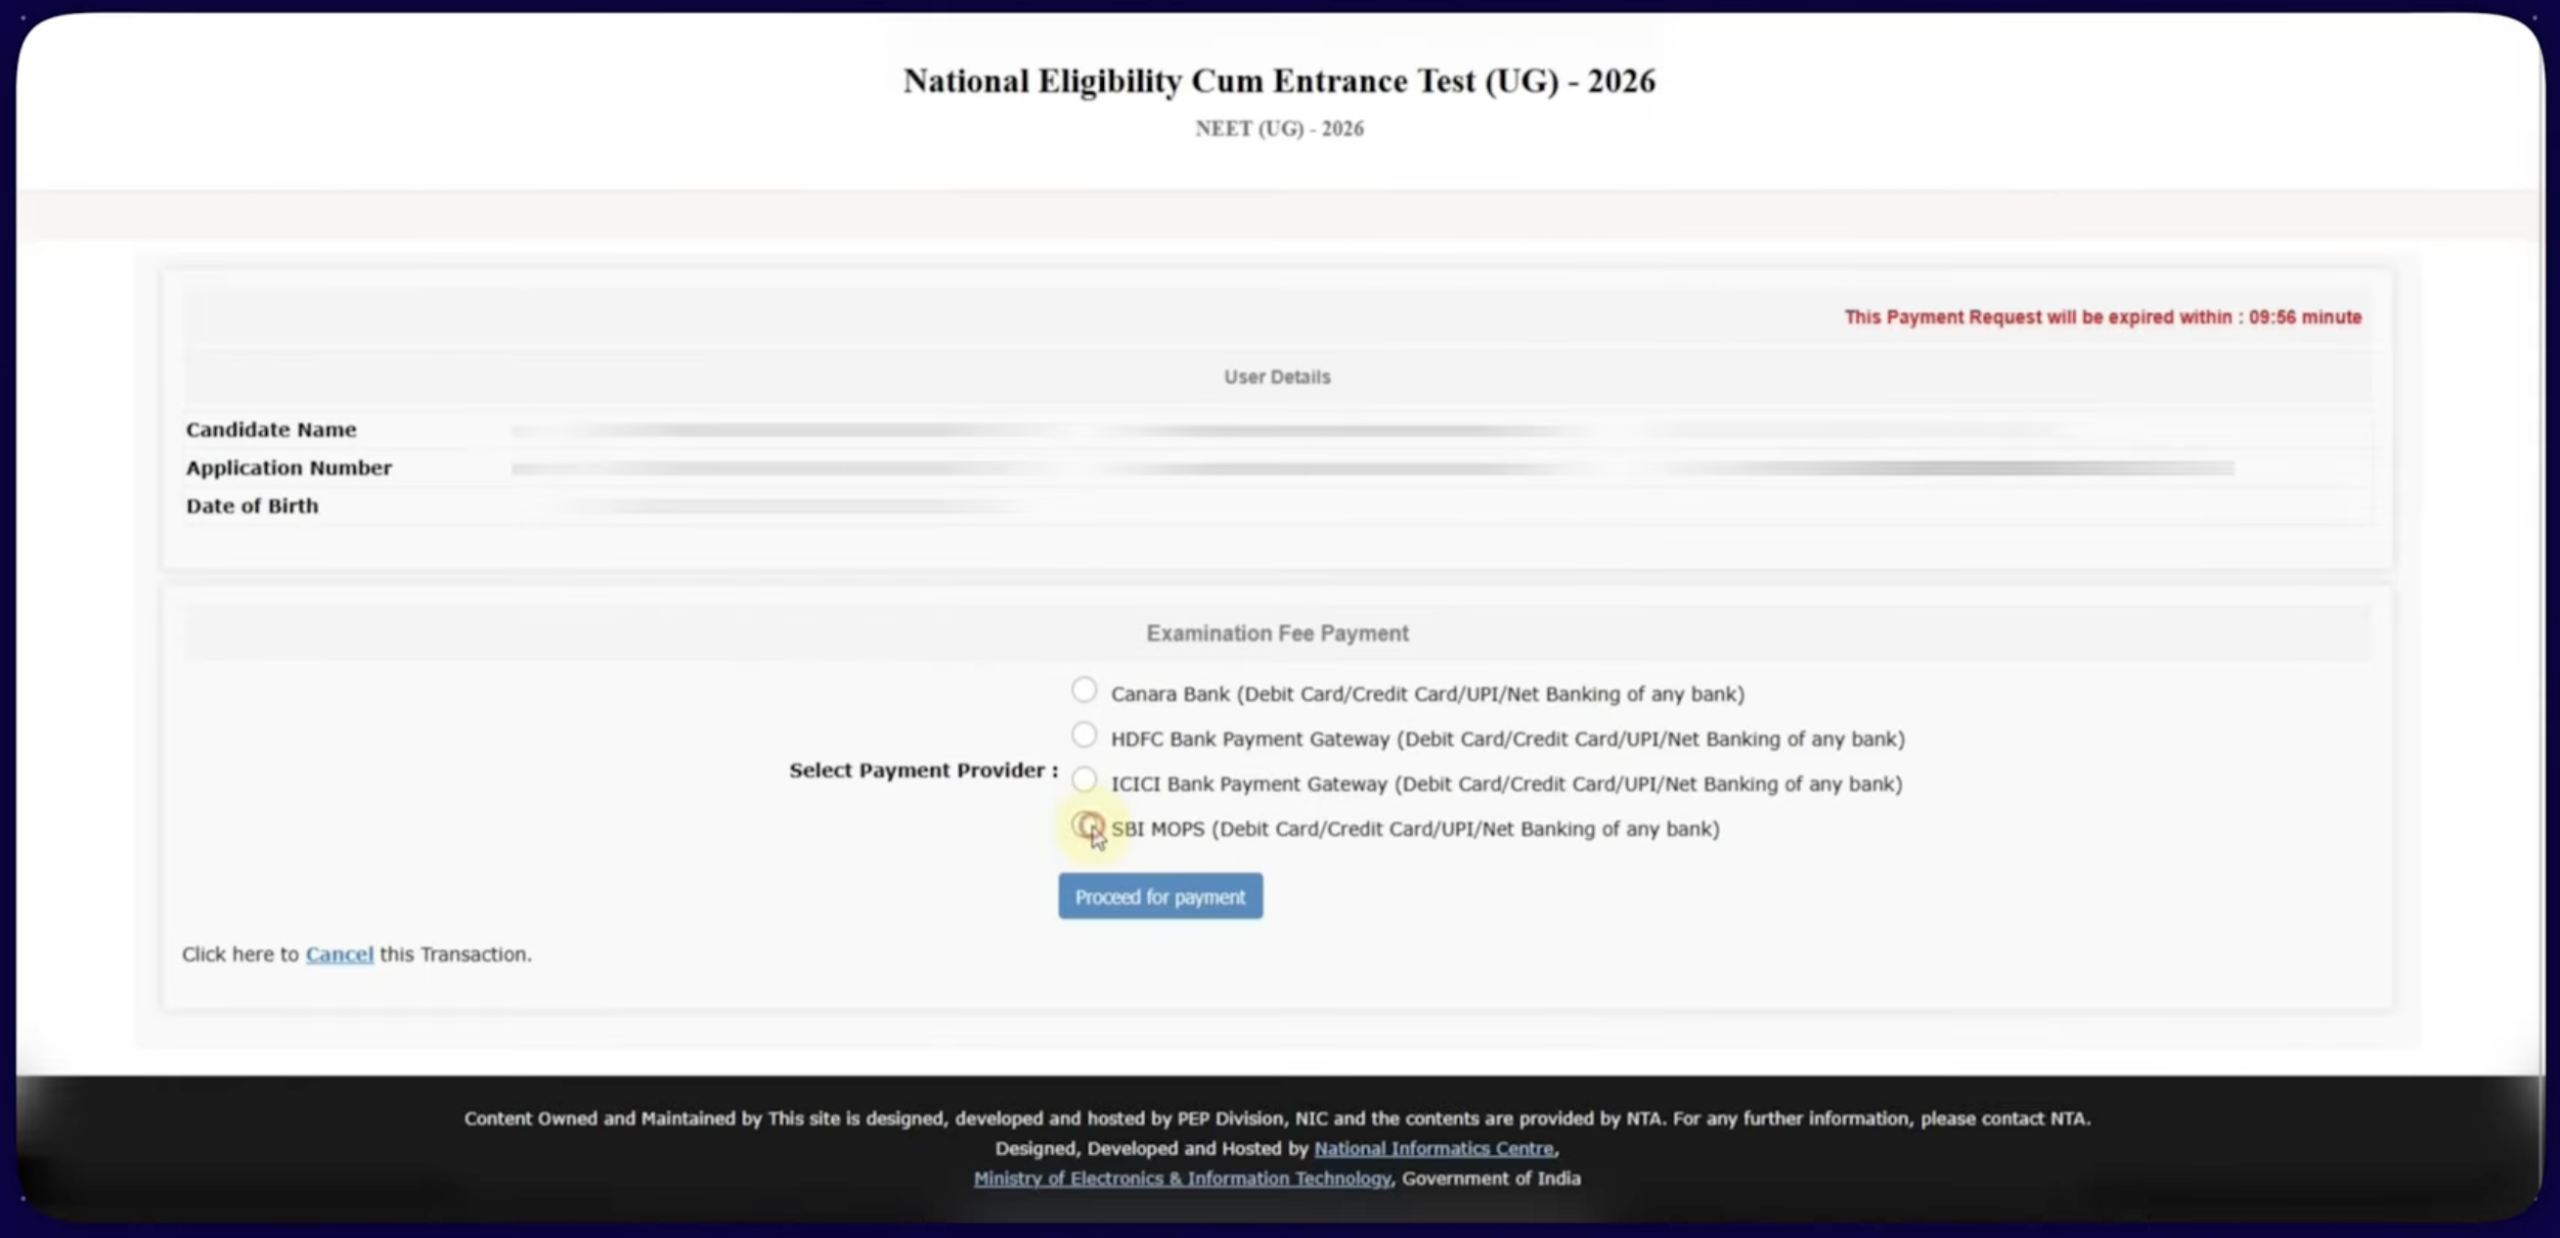
- Select the mode of payment.
- Select the payment provider.
- Pay the application fee by entering the required details.
CHILD HAS PASSED CLASS 10TH FROM cisce WHAT SHOULD WE FILL THE MODE OF RESULT COULMN?
Hi Team,
For NEET UG 2025 , my name in my daugther 10th CBSE markssheet is Inital followed by Given Name , but in my daughter aadhar card it is mentioned givenname followed by expansion of my initial.
For example : 10th Marksheet father name : S Gopal , in my daughter aadhar card it is mentioned as
Daughter Name : Smitha Gopal
c/o Gopal Swami.
will this cause an issue
You have to enter the details as per your 10th mark sheet.
Sir presently iam doing 12th.can i apply for neet???
Yes, 12th appearing candidates will also be eligible to apply.
Can a candidate apply who had just appeared in class 12th but results are not declared yet
Yes, can apply but before that full fill all the eligibility norms.
My signature starts with capital letter but followed by small.Is it okay to use in my NEET application.And can I use my initial for it??
Yes, you can upload this signature.
Hi… My friend is applying for NEET 2023.she is not able to proceed as 12th qualifications are required and her exams are not not yet started also so what should be done about that?
You must contact the officials regarding this matter.
How to get registation from?
NEET 2023 Registration dates & details are yet to be released.